Showing posts with label Italian. Show all posts

Pita Pocket Pizza & Calzones


I like to make quick pizzas and calzones using pita bread ~ both regular or mini sized. Just depends on what I have on hand at the time we're starving. I use a little pizza sauce, some grated/sliced cheese/veggie/meat, a sprinkling of spices/herbs, about 10 minutes in the oven, and then on to our plates. A quick meal or snack, in no time flat. Come and get it!

Mini Calzones made from mini pita pockets.


Quick Creamy Mushroom Risotto ~ Meatless Monday


The day I came up with this spin on the classic Italian rice dish ~ Mushroom Risotto ~ I had some leftover cooked white rice sitting in my fridge, a craving for something Italian, and a hungry tummy that wanted fed...NOW.  So, I hit the pantry and threw this delicious meal together in well under 10 minutes. It's quite a bit quicker than a traditional risotto, with just as much flavor as many of the restaurant versions that I've ordered over the years, it's definitely cheaper than what the restaurants charge, and it doesn't take too long to make. Gotta love that. 

I created this creamy, dreamy concoction by ~ heating the leftover cooked rice (about 3 1/2 cups) with 3/4 of a can of condensed cream of mushroom soup; a small can of sliced mushrooms with their juice; 1/3 cup grated Parmesan cheese; splash of white wine; fresh ground pepper and dried basil. I stirred it all together, added a little bit of water and it all began to take on the classic 'creaminess' of a traditional risotto. The rice still had the correct firmness, and it was made without all the stirring fuss. Cool! Now that I know the secret of how to make this flavorful rice dish so quickly and easily, I think my leftover rice has finally met its match. :) 


Summer-Day Pasta ~ A Snob In The Kitchen


Back-Story on this adapted recipe 
I recently started another food blog ~ Cooking with A Snob In The Kitchen.  This new specialty blog is just going to be for the recipes that I make from the little known, 1967 cookbook, A Snob In The Kitchen.  It's a charming vintage cookbook written by the iconic Italian fashion designer, Simonetta.  Her life story is quite amazing and worth getting to know about.

Since her cookbook is about as scarce as hen's teeth to get a hold of, I thought I'd corral all of the posts I do on her recipes in one place.  (just in case someone wants to search for her cookbook recipes & because I thought it would be fun) I'll also share my adapted versions of Simonetta's recipes on WWIE.  I invite you to link on over to my new blog ~ Cooking with A Snob In The Kitchen to see how I became infatuated with Simonetta, and also to find some additional links to some interesting articles about her life.  Hope you enjoy these vintage recipes as much as I know I'll have cooking and eating them!

Summer-Day Pasta 
serves 2-3
adapted from the ~ A Snob In The Kitchen recipe ~ Summer-Day Spaghetti & the 1967 newspaper article on the NYC cookbook launch at Bergdorf Goodman
 
Ingredients
  • 1/2 Tbsp EVOO (extra virgin olive oil)
  • 1/2 Tbsp butter
  • 6 anchovies fillets
  • 1 medium white onion, chopped
  • juice of 1/2 lemon
  • ** (keep the used, juiced lemon half for adding to the pasta cooking water)
  • 1 Tbsp chopped fresh parsley
  • 6 Tbsp fat free evaporated milk
  • 8 oz of dry pasta (I used a spinach & chive linguine from Trader Joe's)
  • salt/pepper ~ to taste
  • *Optional goodies*
  • 1 Tbsp EVOO for dressing the pasta before serving
  • freshly grated Parmesan cheese
  • crushed red pepper flakes
  • extra parsley for garnish 


Directions
Place olive oil, butter and anchovies in pan, cook over medium heat.  Mash anchovies with the back of a spoon until they break apart.  When hot, add the chopped onions, cook until they are soft and starting to become translucent.  Add the lemon juice and parsley, stir and continue to cook over a low heat for 5 minutes.  Stir in the evaporated milk, do not let it boil.  (when ready to toss the onion/anchovy mixture with the cooked pasta, add a little extra evaporated milk if it needs a little thinning out)

Cook the pasta according to package directions in a large pot, adding the reserved used lemon half to the boiling water.  When the pasta is al dente, drain, return to the pot, & toss with a little EVOO (if using).  Toss the onion/anchovy mixture with the pasta, add salt/pepper to taste.  Garnish with the Parmesan cheese, red pepper flakes and parsley.  Enjoy!


Pasta Puttanesca ~ The Silver Palate Cookbook


I recently bought an old, well worn paperback copy of the 1980's classic cookbook ~ The Silver Palate Cookbook ~ for $1 at a library donated book sale.  I've been reading it (yes, I read cookbooks like others read novels) and was smitten with their recipe for Pasta Puttanesca.  I can't believe that I've never made nor eaten this most classic of Italian pasta dishes before and I was determined to make it soon.  Tonight turned out to be the night...

Of course, I've seen the recipe many times before and have always snickered about why it's called by that name, (I can be such an overgrown kid sometimes) but I was never moved to make it. Tonight, I decided to create an adapted version, using what was available in my fridge.  I loosely followed their recipe ~ the changes I made were to use regular black olives instead of the Nicoise olives; chopped fresh cilantro for the Italian parsley; homemade slow-roasted dried tomatoes for the canned Italian plum tomatoes; leftover thin spaghetti for fresh cooked and a reduced amount of olive oil.   

I cooked it all in my brand new (to me), vintage 1960's Descoware enameled cast iron skillet and it worked out perfectly.  (Julia Child would have been so proud, she loved Descoware and Puttanesca Sauce was really popular in the 60's, I bet she made it even though it's not French)  I plated the richly fragrant pasta and thoroughly enjoyed my dinner.  I will definitely be making Puttanesca Sauce again, maybe next time with a low carb spin using zucchini ribbons in place of the pasta.  This recipe and the cookbook ~ they are both keepers!  

Real-time cooking in my kitchen tonight...and now it's time to do the dishes.  :)


Barilla Plus ~ Farfalle with Three Peppers ~ Meatless Monday


I've become a convert to the Barilla Plus brand of pasta.  Before now, I'd not jumped on the whole wheat/whole grain pasta bandwagon ~ I just didn't like it, no matter how hard I'd try to.  It just seemed too gummy, too chewy and not at all like how I wanted my pasta to taste.  I'd follow all the directions, hoping this time it would be different...but, still yuck!  Until this time...

All that changed when I tried Barilla Plus Farfalle pasta.  This one I like! (nope, I'm getting nothing from them - just telling like it is :)  I followed the recipe on the back of the box of Farfalle Plus (aka butterfly or bowtie pasta).  It was super quick, super easy, super simple, super tasty and was devoured super fast.  This is one bandwagon I will gladly get on!  It would make a wonderful meal for your Meatless Monday or for any day of the week.  Sometimes you just need to wait for the right one to come along ~ glad to know that my wait is now over!  Give them a try and let me know if you like them, too.  :)


Spinach Stuffed Pasta Shells with Mushroom White Sauce ~ Meatless Monday


It's been really busy around here for the last week or so.  We've been having new flooring installed in half of the downstairs...the half with the kitchen, dining room, laundry, entry hall and 1/2 bath.  There were problems (lots) at the beginning, but eventually the new replacement contractors got it handled, and it all turned out OK.  Needless to say, since my kitchen was torn up and the stove was parked in my garage for most of last week, not a lot of cooking (nor blogging) has been done around here as of late.  But, that's OK, for I love my new floors and will post before/after pics soon.  (but, I'm just so excited to share how pretty my new floors look...here is a sneak peak of my new pride and joy)


After the last week, our stress level is now back in the normal range and we have been having a nice weekend. Sunday we were getting a handle on putting things back and I started to think about cooking again.  So, for dinner last night I was trying to use up odds-and-ends and came up with this Spinach Stuffed Pasta Shells with Mushroom White Sauce.  It became a creative mix-and-match (heavy on the canned/frozen items) and I was happy with the result.  For the stuffed pasta shells ~ Since I haven't been grocery shopping for a while, I relied on frozen spinach, some leftover fat free cottage cheese and some dried Italian herbs to stuff the already-cooked jumbo pasta shells (from a 1/2 full box I found when emptying the pantry so they could put the flooring in).  I then added some canned fire roasted tomatoes over the top, along with some frozen Trader Joe's tri-colored bell peppers.  For the sauce ~ I was all out of Alfredo and spaghetti sauce, so I used a can of condensed low fat cream of mushroom soup.  I added just a little water and then pureed it with a 1/2 can of drained canned Navy beans (to up the protein count) and poured my 'white sauce' all over the stuffed shells.  I sprinkled on a bit more Italian herbs, some shredded cheese and baked it semi-covered at 400 degrees for 30 minutes. 

Our neighbors (Bill & Cheryl) were hanging out with Roy on our front porch at the same time I was getting dinner ready, so they were able to stay for a very casual dinner, dining al fresco on the porch.  Our meal was a concoction, to be sure, but with a side salad and a quick brownie dessert, it was a nice way to end our Sunday.  As we were eating, I decided this would have made a good Meatless Monday meal.  Who says you have to plan them?  Sometimes you can just scrounge around your kitchen and make a meal happen. So what if our Meatless Monday happened to be on Sunday this week ~ that's OK by me!   :)    It's finally starting to feel like spring around here and it was so nice to be able to enjoy good friends, good weather and share good meatless eats!  Hope the weather where you're at is just as nice.


No-Bake Pizzelle Strawberry Layer Cake


I bought a near-new pizzelle maker at Goodwill a few weeks ago.  I've been searching the web, looking for healthy(er) pizzelle recipes and kept seeing how pizzelles are often one of the cookies served at an Italian Easter celebration, so I thought it would be fun to make a batch for the upcoming Easter holiday.  I found this basic recipe and tweaked it a bit.  I replaced half the flour with whole wheat pastry flour, used only egg whites, replaced the anise extract with vanilla extract and used avocado oil instead of the butter.  The pizzelles turned out OK, but were not great.

Since I had so many cookies, I started looking for different ways to use them, and came across this site that gave a recipe for a pizzelle pie.  Hmmm... Sounded interesting, so I tinkered with it a smidgen and made my own adapted version.  We really liked it, so much so, that I'll be making another No-Bake Pizzelle Strawberry Layer Cake for our Easter dinner.   I see endless possibilities with this no-bake dessert.  Guess I'll need to perfect that healthier pizzelle recipe, not for the cookie's sake...but for the cake's.  :)

No-Bake Pizzelle Strawberry Layer Cake
serves 2-4

Ingredients
  • 5 to 7 pizzelle cookies ~ or as many as you want, to get it as high as you want (homemade or store bought, anise or vanilla flavored ~ as you like)
  • 1 small box of vanilla instant pudding mix, prepared according to box directions (or flavor of choice ~ regular or sugar-free)
  • strawberry jam or jam flavor of choice (I used homemade ~ see my post on my homegrown/homemade strawberry jam from last year)
  • powdered sugar for dusting or whipped cream for topping (optional)  


Directions
Spread about 2 teaspoons of jam on the top of each pizzelle, all the way to the edge. Place first jam covered cookie in a suitable container*, then spoon over about 1 1/2 - 2 Tablespoons of vanilla pudding, on top of the jam, smoothing all the way to the edge.  Place next jam covered cookie on top of the now pudding covered cookie and continue layering this way until you are all done, ending with a pudding covered cookie on the top.  Cover the now completed 'layer cake' and let it sit in the fridge overnight.  It will begin to absorb the moisture from the jam/pudding and turn into a pretty and delicate looking layer cake.  Cut into wedges and serve with a dusting of powdered sugar or top with whipped cream, if desired.

*if you want to be able to remove the layer cake easily for presentation, place a strip of plastic wrap in the bottom of the container, with the edges hanging over the edge of the container and use that to lift the whole layer cake out when ready to serve the next day.


I think this would be good with a tiramisu spin, or maybe with marmalade and some type of liqueur ~ the possibilities are endless.  I really like the idea of making it the night before and just pulling it out of the fridge when you need it.  A no-fuss, no-stress dessert, I like that!    

Happy Easter ~  From our family to yours!


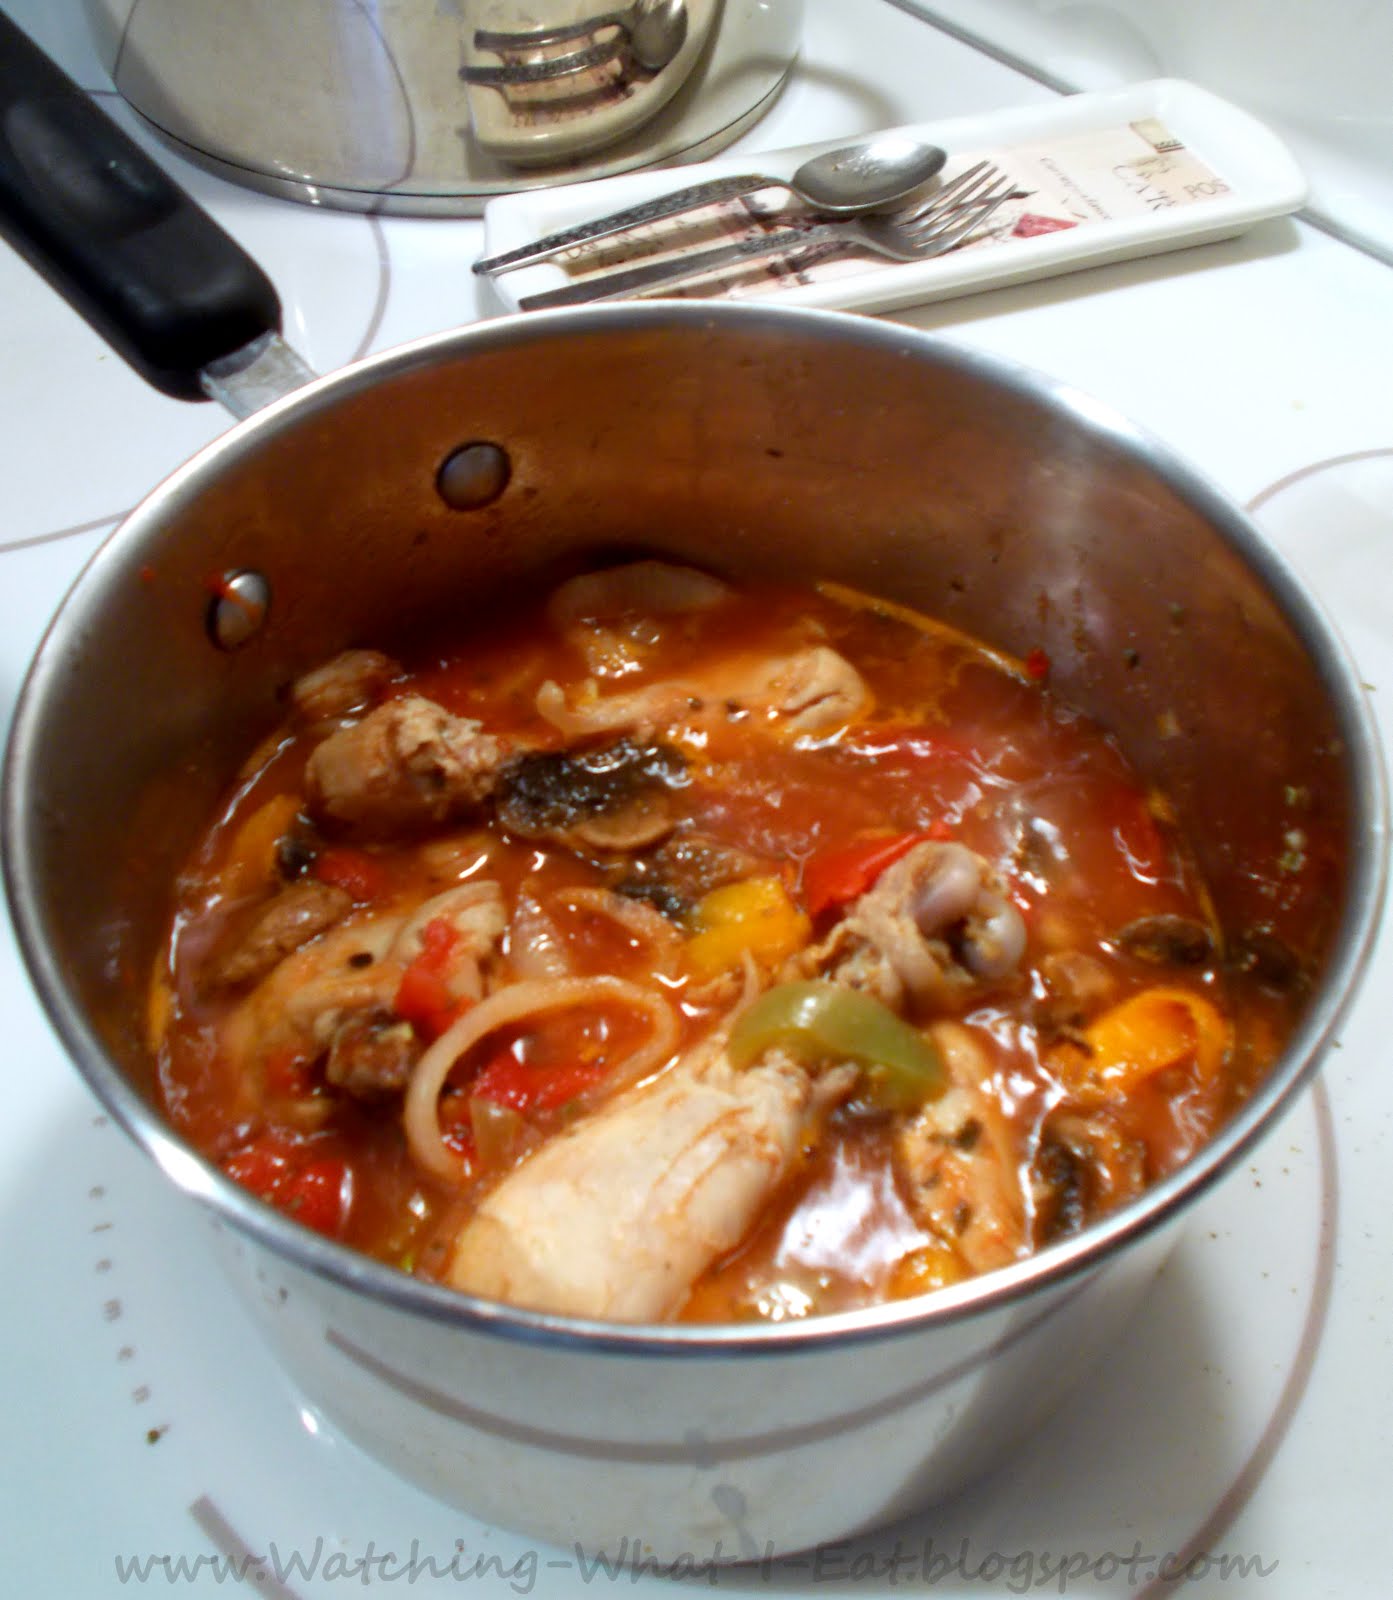
Spiced Chicken Cacciatore


Since it's the New Year, I'm back to looking for healthier recipes that have a lot of flavor, but go light on the calories.  This Weight Watchers recipe for ~ Spiced Chicken Cacciatore ~ fits the bill.  I really liked the addition of the curry powder in this dish.  It's an unexpected spice, not one you would find in a classic Chicken Carriatore recipe, but, it's one that I really like.  Its flavors (minus the curry) are similar to the French inspired ~ Hunters Chicken / Chicken Chasseur ~ post that I did last year. (check out that recipe post ~ here)


I decided to serve it with rice, since I already had some on hand and used skinless legs for the same reason.   I also used sliced/frozen, 3-color bell peppers from Trader Joes, I've always got some in my freezer, I just love 'em!  This turned out to be a really tasty dish and one that I'll be making again.  So, if you're looking for a new way to cook your chicken, that's not quite traditional, that's lower in calories and is pretty quick and easy to get to the table ~ than give this one a try.  Check out the recipe for the Spiced Chicken Cacciatore over on the Weight Watchers site.  Enjoy!  


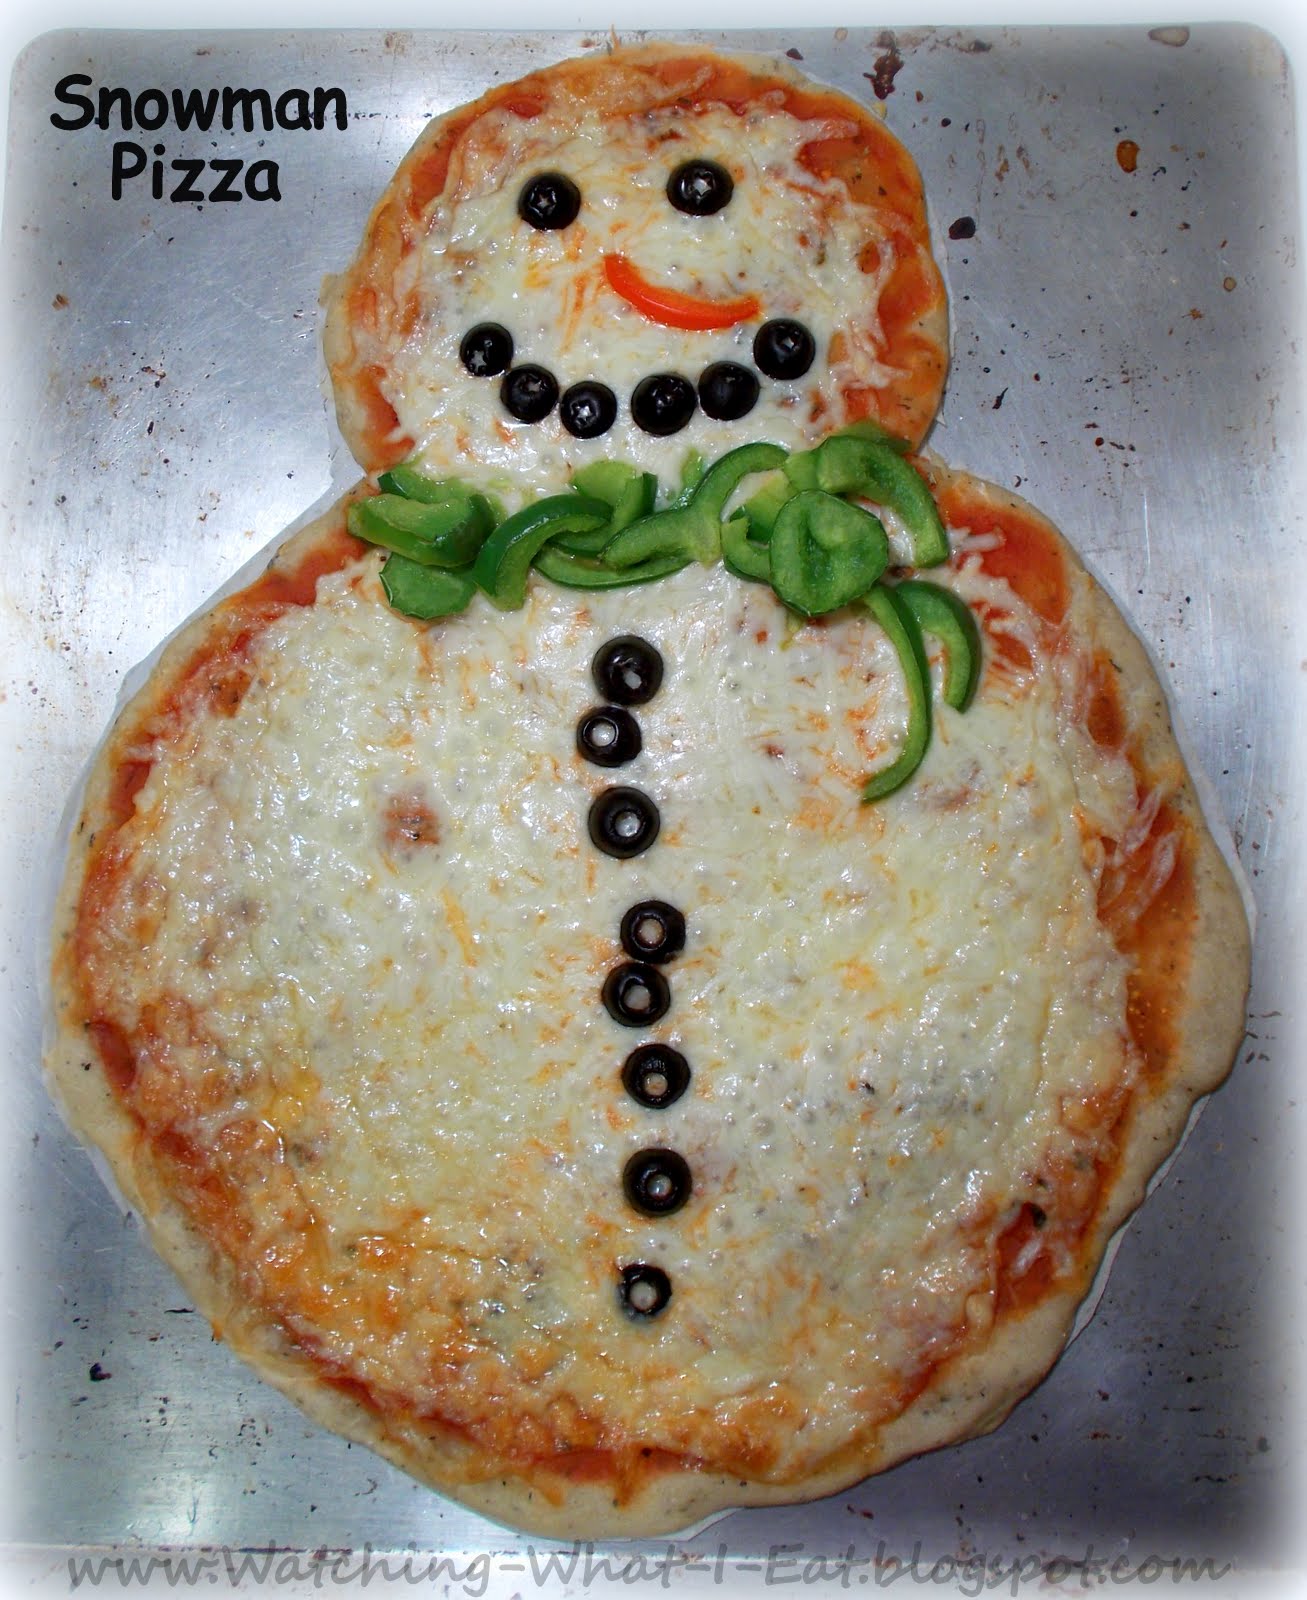
Easy Homemade Snowman Pizza


I recently saw a photo of a pizza shaped like a snowman.  I thought it was too cute and decided to make my own version for a fun holiday meal.


Super easy to make,  I just used a premade herbed pizza dough from Trader Joe's and the usual pizza fixin's.


Then I shaped it like a snowman, decorated it like a veggie-dressed snowman and then baked it following the directions on the bag of dough.


Easy-Peasy!  I just love Snowmen ~ How about you?


One can of Mixed Beans & a pound of hamburger ~ two easy, different meals...

A can of ~ Mixed Beans ~ a pound of hamburger and some of your favorite ethnic ingredients (probably already in your pantry or fridge) and you've got a quick, easy and tasty dinner on the table in no time flat. ~  I like it like that!  How about you?

Sometimes for a quick dinner I'll turn to a can of beans and a pound of ground sirloin.  We have a wonderful local, family-run, village market in our little town and they have an old-fashioned meat counter.  The butchers will cut your meat right when you order it, or you can buy from the well-stocked meat case.  I buy the best quality, tastiest ground beef and it is no more expense than a big-box store (you know I'm talking 'bout you Walmart).  They have a loyal clientele and you can always look forward to a little chit-chat about what's going on around town.  Ahh, life like it used to be...  It's nice to be able to find such a place in this day and age, as well as being able to help out a local business.


I love the convenience and taste of canned beans.  If you're looking for a way to get creative with plain ol' hamburger and beans, this might hit the spot for your family like it does for mine. Enjoy ~ Toot-toot!  : )


I make the hamburger patty round or oval, depending on my mood.  To the ground beef I'll ~ add a handful of bread crumbs, sprinkle in some other seasonings/herb/spices, mix it, shape it and then fry it up.  Once it is cooked, I'll set aside the meat, clean out the pan, then add the beans.  I go to town doctoring them up, re-add the cooked hamburger patty and then let it all simmer for a few minutes so it is heated through before plating it up.  Depending on how you doctor-up the beans, you can get different cuisines.  For this pair of dinners, I used a can of Pinto & Great Northern Mixed Beans.
 
For this meal, I went the Tex-Mex route with the beans ~ doctoring them up with a blend of Mexican herbs and spices, bell peppers and salsa.  When I plated it up, I topped the glorious mess with more salsa, some sour cream and crushed tortilla chips. 


For the other meal I went the Italian route ~ I doctored up the mixed beans with a blend of Italian herbs/spices and sauteed mushrooms. Then ladled the beans over the the hamburger steak when I  plated it up and added fried onions to top it off.


Osso Bucco ~ from The 4-Hour Chef & Dan's Kitchen ~ Guest Cook Post

Osso Bucco ~ Made by my friend, Dan.  Photos taken in his kitchen, following the recipe in the new cookbook ~ The 4-Hour Chef ~ by Timothy Ferriss.  It looks absolutely AMAZING!  I've got to try this in my kitchen!

My friend, Dan, just got the new cookbook by Timothy Ferriss ~ The 4-Hour Chef.  On Wednesday night he made the recipe for ~ Osso Bucco ~ and posted the pictures on Facebook.  I was so impressed with the photos of how the dish turned out, that I just had to share his pictures and his commentary on my blog.  I'll be getting a copy of this cookbook for myself and will be trying out some of the recipes.  If they're all as good as this one looks, I think we're all going to be in for a treat!


Osso Bucco ~ photos and commentary by my friend, Dan...


I am a big fan of Tim Ferriss' books. The 4-Hour Chef came out yesterday. I am about 120 pages in so far. ~ The recipe ~

Beginnings of Osso "Buko". Typically, Osso Bucco is made with veal shanks, but using lamb shanks turned out just as delicious.

After placing carrots and lamb shanks in the pot, you take the canned whole tomatoes and pour on top.  ((San Marzano Tomatoes ~ definitely a difference from our Red Gold tomatoes))  Then you pour in white wine and cover with spices.
 
It took ten minutes to prep and it took another 2 hours to cook, but was definitely worth it. Unfortunately it only took a few minutes to devour . . . I was hungry. 

** a little more detailed cooking instructions from Dan, slightly adapted from The 4-Hour Chef Cookbook. ~~  Recipe is roughly:

Scrub bunch of carrots and cut off ends.  Place in bottom of dutch oven.  Take your lamb shanks and place on top of those.  Open can of San Marzano tomatoes and pour puree on top as well as squeeze each tomato with your thumb first then squeeze them with full hand and drop in.  Then drizzle about 2 tablespoons of extra virgin olive oil over the top.  Then take about 3 big 3 finger pinches of salt and sprinkle on top. Also, 10 good grinds on a peppermill.  Then pour the dry white wine (what ever dry white you like) so that it is up to 1/2 or 3/4 of the lamb shanks. Cook in preheated oven, covered, at 350F for 2 hours. Can go for up to a half hour longer in oven if necessary for timing.


I love it when friends of mine share their photos of what they're making in their kitchens.  It inspires me check out what cookbooks are inspiring them to get creative in the kitchen.  Can't wait to crack open this cookbook and take a peek!  Dan ~ Thanks so much for sharing your photos and how you made the meal!

**************************************

UPDATED 11/26/2012 ~ Kris, from over at the blog ~ The Iceland Trail ~ suggested you sear the meat before cooking, so you will get a better overall flavor to the dish.  Read his comments for more recipe ideas. Thanks for sharing, Kris!


UPDATED 12/6/12 ~ Kris, from the blog~ The Iceland Trail ~ let me know he now has a recipe blog post for his version of making Osso Bucco.  He has step-by-step photos, showing how he  makes his.  Cool!


Since I already had lamb arm chops ready to go, I followed his recipe and then tweaked it a bit.  I added bell pepper, more onion, fresh garlic, a big can of crushed tomatoes and dry vermouth. (had to make due with what I had on hand) and a couple of sprigs of fresh rosemary. (the last from my garden)

 
I cooked it in my new Dutch Oven, at 325F degrees, for a little over 3 hours. I served it with steamed new potatoes and mushrooms.  It turned out AMAZING!  Roy and I both went back for seconds, we didn't lick the plates clean, but we did do the next best thing ~ we got out the bread and butter. : )  Roy was VERY happy with the meal, as was I.  This cut of lamb can be a tad greasy, so we had to fish around a bit to get everything on the plate. I have a container of leftovers, so in the morning I'll just skim off the remaining fat and we'll be good to go for round two. (or would that round three? heehee)


I think using all the additional veggies/herbs gave the dish a flavor of ~ a cross between Osso Bucco and Cacciatore.  I'll be making this meal (or a variation of it) quite a few times over the course of the winter.  Thanks to both of you guys, this is now one of my favorite new recipes!


Quick English Muffin Pizza

Quick English Muffin Pizza ~ this is a favorite in our house.  It's perfect for when you have to have a meal on the table quick & nothing but pizza will do.  Great for kids & grown-up kids, alike.  :)

J really likes his pizza, but sometimes we don't have the time to bake one from the freezer ~ especially when he wants to eat now!  Waiting for the oven to warm up & then waiting for the pizza to bake, just will not do!  For times like this, I'll often make a Quick English Muffin Pizza.  J just can't resist helping to make his own personal sized pizzas & who can blame him.  It's fun.

I always keep some leftover spaghetti sauce in the freezer, in small bags, just for these occasions.  I'll thaw it out & use it as the 'pizza sauce', giving the split English muffin a thick coating of sauce.  Anything that's in the fridge is fair game as far as the toppings go.  In this picture, I used some leftover, cooked ground beef, with a bit of Italian herbs & some Parmesan cheese.  Just give it a quick spin in the microwave & pizza is served!


Spinach Stuffed Pasta Shells with Meat Sauce

Spinach Stuffed Pasta Shells with Meat Sauce

I had some jumbo pasta shells languishing in my pantry, just dying to come out of the darkness & be part of the kitchen limelight...  OK, I had an old box of pasta shells, sitting on the shelf that needed using up. :)  I wandered around the 'net & found this recipe from SkinnyTaste for ~ Spinach Stuffed Shells with Meat Sauce ~ that sounded good, so I made it. 

Since we have a local butcher that has great, fresh extra-lean ground sirloin (they grind it several times a day) I used that instead of the ground turkey.  I reserved 1/2 of the cooked ground beef & added that to the spinach stuffing mixture, gave it all a good stir & then proceeded with the recipe.  I like to have a meaty filling in my pasta shells & we didn't notice having a bit less meat in the meat sauce.  I think it makes it feel like an even heartier dish that way.  Who says eating light has to be boring... certainly not me.  So, if you have an old, sad & lonely box of jumbo pasta shells hanging around your kitchen, why not take them out & ask them to dance?  They'll love you for it!  

Stuffed Portobello Mushrooms ~ Italian Style ~ for Meatless Monday

Stuffed Portobello Mushrooms Italian Style ~ a quick and flavorful meal, full of rich Italian flavors, low carb, & depending on your choice of cheeses ~ low fat & low cal.  Perfect for Meatless Monday!
 
I love cooking with portobello mushrooms, there is something about that big, 'meaty' mushroom that I really enjoy.  Sometimes I slice them, then saute or grill.  Sometimes I bake them.  Today my 'shrooms, they got baked.  :)  This meal came together in minutes & cooked for just a bit more.  This big, tasty mushroom was on the table quickly & was devoured promptly.  I can always tell how good a meal is by how quiet it gets around the table when we are eating... and it was real quiet... until everyone asked (clamored) for seconds, that is.

A word to the wise ~ make enough for seconds.

P.S. ~ Do it the first time around.  It's so much quicker that way... about 20 minutes quicker.  :)


Stuffed Portobello Mushrooms ~ Italian Style


  • big portobello mushrooms ~ cleaned & ready to go ~ As many as you like & may I suggest at least 2 per person. You might as well save yourself the time & trouble & go ahead & make a lot.  It will save you having to start the second batch before you have even had the chance to finish your own 'shroom.  (somehow the cook always starts eating last around here :)  That way yours won't get cold & nobody will give you the stink eye.  Not that that happens around here or anything...  ;)
  • cottage cheese ~ regular, low-fat or fat-free ~ whatever floats your boat
  • cooked spinach ~ from fresh, frozen or canned, well drained
  • your favorite herbs & spices ~ some I like to use: Italian herb blend, basil, onion/garlic powder, oregano, smoked paprika, crushed red pepper flakes, salt, pepper
  •  shredded pizza cheese ~ buy the pre-shredded bagged kind or grate some of your favorite cheese(s)
  • Parmesan cheese ~ sprinkle liberally in, on & over the gloriously layered mushroom as you are assembling it & when serving it

Look at all that lovely, flavorful juice the mushroom makes while it bakes.  Anybody seen my fork??  :)


Preheat oven to 400F degrees.

Prep your baking sheet or cast iron skillet with cooking spray and/or foil.

Place the cleaned mushrooms ~ gill side up ~ on your baking sheet/cast iron skillet.

Assemble the stuffed mushroom in layers, starting with:
  1. jarred spaghetti sauce or tomato chutney ~ spread to the edges of the mushroom
  2. sprinkle all over with your choice of herbs & spices 
  3. cottage cheese ~ spread a good sized amount all over the sauce
  4. add a bit more sauce to the center of the mushroom & spread out about half way
  5. add the spinach in cool dollops or spread it around ~ as you like
  6. sprinkle a bit more herbs/spice ~ as you like
  7. top it all with the pizza cheese & Parmesan cheese ~ as much or as little as you like
Bake the mushrooms for approx. 15-20 minutes ~ until they are cooked through, the filling is beginning to bubble & the mushroom is giving off it's lovely juices.

Plate it up & pour any of the mushroom juices over the top & add additional cheeses ~ if desired.

Enjoy!


** This would be such an easy recipe to change up, just vary the 'stuffing' fillings ~ some to consider...

~ for a Mexican Style version use: salsa, Mexican spices/cilantro, cottage cheese, spinach & some smashed chili beans ~ top with sliced avocado, jalapenos & crushed tortilla chips when serving

~ for a Greek Style version use: fresh chopped tomatoes tossed in olive oil (or Greek salad dressing) & Greek spices/oregano, thin sliced/chopped zucchini, spinach, olives, sliced onions, Greek Yogurt & feta cheese ~ sprinkle with a hint of mint when serving

Join the Movement


Pan Fried Italian Bread Crumb Cod ~ Fish Friday

Pan Fried Italian Bread Crumb Cod ~ a quick & flavorful way to cook fish.   Using Pam cooking spray & just a little oil help to keep it low fat.  

One of my favorite ways to cook fish is also one of the easiest.  I like to dredge fish in bread crumbs ~ Italian Spiced or Plain ~ (depending on my mood) and pan fry it in a little oil.  We always enjoy it & it's a quick meal to get on the table.  That's always a plus when you have hungry boys to feed!  While the fish is cooking, I'll steam some veggies & in about 20 minutes dinner is ready.  Almost quicker than takeout, too bad about the washing up though... heehee  :)

Pan Fried Italian Bread Crumb Cod

  • nice sized cod fillets, about 6 oz. each ~ as many as needed to feed your hungry crew ~  try to get them of equal width/thickness so they will all be done at the same time
  • 1/4 - 1/2 cup Italian Spiced bread crumbs ~ depends on how many fillets you are making, start will the smaller amount & add more bread crumbs if necessary (I hate to waste stuff :)
  • 1/3 - 1/2 cup cup milk, or maybe a bit more, depends on how many fillets you are making  (for briefly soaking the cod in ~ optional)
  • your favorite spices/herbs/blends, some I like to use ~ onion powder, garlic powder, smoked paprika, sweet paprika, basil
  • salt & pepper, to taste
  • cooking oil & Pam cooking spray
  • I Can't Believe It's Not Butter Spray ~ optional

Rinse cod & place fillets into a container & pour milk over the top.  Allow the fish to soak in the milk for about 10 minutes.  Discard any remaining milk after you are done soaking the fish in it. (if skipping the milk step, just rinse off the fish & get right to the next step)

When the fish is almost done soaking, heat up your skillet over a medium-hot heat.  Add Pam cooking spray & a little cooking oil just before adding the fish, you want the oil good & hot, but not so hot that it burns the coating on the fish.  I like to use both Pam & cooking oil, so that way I'm sure the fish won't stick.  Roll the oil around the pan before adding the fish, so you have good oil coverage.

Place the Italian Spiced bread crumbs in a flat bottomed container.  After 10 minutes, take the fish out of the milk & let some of the milk drip off & then dredge the fish in the bread crumbs, get both sides so it's completely covered in bread crumbs.  Sprinkle a little spice(s) on both sides ~ if desired.  (The beauty of using the Italian Spiced bread crumbs is that it's tasty enough to just use as is, no additional spices/salt are necessary.  It saves you from having to spice up the fish if you are  in a hurry or are just feeling a bit uninspired to play around with your spices :)

Add the bread crumb covered fish to the hot skillet & depending on the thickness of your fish, it usually takes about 5 minutes per side ~ or about 10 minutes total for both sides.  Shake the pan a little bit to help loosen the fish before flipping, that will help the coating to stick to the fish & not the pan.  :)

Fish will be opaque when done.  Depending on how hot your skillet is & how thick your fillet is, it may take more or less time.  If you are not familiar, with cooking fish, or want a refresher course ~ go here ~ to learn the basics.  :)

When fish is cooked all the way through, remove to a plate & spray with some I Can't Believe It's Not Butter Spray ~ optional.   Serve the cod with your favorite side dishes.  Enjoy!


Low Fat Eggplant Parmesan ~ Meatless Monday

Low Fat Eggplant Parmesan ~ By cooking this recipe with Pam cooking spray instead of frying it in the typical amount of oil, I can enjoy this tasty, classic Italian dish whenever the mood strikes. This dish is all done on the stovetop and is really a quick & easy meal for any day of the week.

I'm a huge fan of the Italian dish ~ Eggplant Parmesan.  The only problem I have with the dish, is that it's often really high in fat calories since eggplant is notorious for soaking up oil while it's being cooked.  To get around that little problem, I came up with a way to cook it that's much more healthy, figure friendly, quick & easy than the traditional method.  I cook my Low Fat Eggplant Parmesan in a way that's similar to my recipe for Fried Green Tomatoes ~ I shared  that recipe last week on Meatless Monday.

With so many beautiful, fresh eggplants now showing up at local Farmers Markets, I thought this would be a perfect time to share how I make this healthier spin of a classic summertime favorite.  Buon Appetito!  :)


Low Fat Eggplant Parmesan
serves 2

  • one medium eggplant, sliced into 1/4 inch slices
  • 3 Tbsp Italian Style/Spiced bread crumbs 
  • 1 Tbsp grated Parmesan Cheese
  • smoked paprika (or regular) ~ for sprinkling on the eggplant slices before cooking
  • onion powder ~ for sprinkling on the eggplant slices before cooking
  • garlic powder ~ for sprinkling on the eggplant slices before cooking
  • 'I Can't Believe It's Not Butter' Spray ~ for spraying on the eggplant slices before/after cooking
  • Pam, butter flavored or regular
  • salt & pepper, to taste
  • your favorite Italian Marinara Sauce
  • your favorite Parmesan Cheese sprinkled over the dish when serving
  • fresh (or dried) basil for sprinkling over the dish when serving ~ optional
  • crushed red pepper flakes for sprinkling over the dish when serving ~ optional 


Heat your favorite Italian Marinara Sauce (I love Trader Joe's Tomato Basil Marinara) in a pan & keep warm while you are prepping/cooking the eggplant.

Spread Italian bread crumbs in bottom of a plate for dredging the eggplant slices in. Take the eggplant slices, dip each one in water, shake it off & then dredge both sides in the Italian bread crumbs.  Sprinkle one side with the smoked paprika/onion powder/garlic powder & then spray with 'I Can't Believe It's Not Butter' Spray.  

Heat skillet large enough to cook the eggplant in, over medium heat.

When the eggplant slices are ready, spray the skillet with Pam & lay the eggplant slices in a single layer, with the paprika/onion/garlic powder sprinkled side down, so that side cooks first.  Cook for approx. 3-4 minutes.  While the first side is cooking, sprinkle the top side of the eggplant with paprika/onion/garlic powder & spray with ICBINB Spray.  When the 3-4 minutes are over for the first side, flip & cook the other side for an additional 3-4 minutes or until the eggplant slices are golden & cooked through.  Give the cooked eggplant a final spray of ICBINB Spray, right before taking out of the skillet.

Serve the cooked eggplant with the Marinara Sauce spooned over the top of the slices.  Sprinkle the whole thing with Parmesan cheese.  Salt/pepper, to taste.  Add some fresh basil & crushed red pepper flakes ~ if desired.

 *  A side dish of your favorite pasta goes perfect with this meal.  :)


Lemon Basil Chicken Tenders with Zucchini Ribbons

Lemon Basil Chicken Tenders with Zucchini Ribbons ~ this chicken dinner has all the sunny flavors of the Mediterranean since it has fresh lemon, lemon zest & basil.  The zucchini ribbons are a low carb stand in for pasta noodles & the tomatoes/green onions give it a 'light tomato sauce' taste. It cooks up quick, so it would be a great midweek meal.

I saw this recipe in our newspaper last week & decided to give it a try.  Happy to say, it was easy to make & we enjoyed it.  I added a few things to their recipe & tweaked/adapted it a bit ~ no surprise there, heehee.  :)  I really enjoyed the sunny flavors of fresh lemon, lemon zest & basil, all mingled together.  This meal kinda reminded me of a low cal, low carb, low fat version of Chicken Piccata.  Just make a few tweaks ~ add a little white wine, capers, exchange the basil for parsley & add a bit of Parmesan cheese ~ & now you've got a whole different meal.   Love when that happens ~ two different recipes for the price of one!   This dinner is quick enough to throw together for a midweek meal, but is nice enough to serve guests.  It's also a good meal if you are eating Fat Flush Plan style...how cool is that?  :)  Enjoy!


Lemon Basil Chicken Tenders with Zucchini Ribbons
serves 2

  • Juice of 1 lemon
  • zest of 1 lemon
  • 2 Tbsp chopped fresh basil  or 1 Tbsp dried basil
  • 2 tsp olive oil
  • 1 green onion, chopped, green & white parts
  • 1/4 tsp garlic powder
  • 1/4 tsp onion powder
  • 6 boneless, skinless chicken breast tenders
  • smoked paprika (or regular paprika) ~ to sprinkle on chicken while cooking

  • 1 medium zucchini 
  • 1 small tomato, chopped
  • 1 green onion, chopped, green & white parts
  • 1 tsp olive oil
  • 1 Tbsp water
  • salt & pepper, to taste 

Combine first 7 ingredients in a bowl ~ add chicken to the marinade and turn to coat.  Let sit in marinade while you prepare the zucchini ribbons. 

Use a vegetable peeler to shave the zucchini into very thin "ribbons."

Heat a skillet over medium.  Add chicken tenders and the marinade.  Sprinkle on a little smoked paprika on the chicken tenders.  Cook chicken tenders 3 minutes ~ flip, sprinkle a little more smoked paprika on other side, cook another 3 minutes.  (Approx. 6 minutes total, 3 minutes per side) 

While chicken is cooking ~ in separate pan, over medium heat, add the oil & water, when hot ~ toss in zucchini ribbons, tomatoes & green onions.  Cook until zucchini/tomatoes start to wilt & is hot throughout, about 3-4 minutes.  Salt & pepper, to taste.

Serve chicken tenders with any juice from the pan & zucchini ribbons, on the side.  Salt & pepper, to taste.   Enjoy!

Spaghetti Pie Casserole ~ getting creative with leftovers


I had a bunch of spaghetti left over one night & knew I had to spruce it up for the next go-around.  I remembered Grandma Bunni used to make something she called her special ~ Spaghetti Pie Casserole ~ whenever she had an abundance of leftover pasta, so I decided to follow suit.  She always threw things in in layers ~ like shredded cheese, cooked spinach or veggies, ricotta or Parmesan cheeses, or maybe even some sour cream mixed with chopped green onions & then she topped it all with another layer of cheese.  Of course, back then she used all full-fat ingredients, I don't think they knew what reduced calorie or low-fat was back then. (ah, the good old days ~ heehee)  Looking back, I never knew I was enjoying leftovers, to me it was just having her special ~ Spaghetti Pie Casserole.  And as I remember it, there were never any leftovers.  :)


For my rendition, I layered the already spaghetti sauced-tossed pasta (I dare you to say that, fast, 3 times :) with some low fat shredded mozzarella & low fat ricotta, threw in some cooked zucchini, along with some fresh basil, chopped green onions & some extra Italian spices.  I topped it all with grated Parmesan & low fat shredded cheese blend ~ then baked it in the oven until it was all hot & bubbly. I added a salad & garlic bread and dinner was served.

It really is a tasty enough dish to make it on purpose, not just to be used as a vehicle for leftover spaghetti.  So, if you want to try making it from scratch, here is a recipe that sounds like it would be really good & popular with both grownups, as well as with kids.  Buon Appetito! 

Related Posts Plugin for WordPress, Blogger...