Showing posts with label kid friendly. Show all posts

Grilled Cheese-Potato Chip Sandwich ~ Meatless Monday


My son is really into the Disney cable show ~ Pair of Kings.  So much so, that he asked me to make one of the meals that was served one night to the teenaged, King Boomer.  It was a grilled cheese sandwich that had potato chips nestled inside.  OK.  Simple enough to do and it made my kid excited to eat his meatless dinner ~ Nice!


This really needs no recipe ~ just make a grilled cheese sandwich like you normally do, but before you put the two slices of bread together...slip some of your favorite potato chips into the middle.  J likes a thicker ruffle potato chip, I'm partial to a thinner, Lay's classic potato chip.  Anyway you make it, expect a meal fit for a kid king...or a pair of them.   :) 


Threaded Hot Dog & Spaghetti Bites (a.k.a. ~ Spiders or Jellyfish or Octopus or Squid Dog Spaghetti Bites)


I keep seeing versions of this Threaded Hot Dog & Spaghetti Bites recipe floating around Pinterest, and decided I finally had to try making them in my kitchen.  This simple recipe is a snap to do, and little hands make for the perfect kitchen assistant.


My son, J, was totally on board with this meal.  He had a blast stabbing the uncooked spaghetti noodles through the cut up hot dog 'bites'...


...maybe a little too much fun.  :)

He watched the entire cooking process and was amazed as this fun-to-make recipe changed appearance and texture. We couldn't decide if our weird creations looked more like spiders...or jellyfish...or maybe even a little like an octopus or squid.  Whatever they were, they sure gave us the giggles.  J gobbled down his plateful of happy food really quick, and was back for seconds in no time flat.  Actually, we all enjoyed this kid-friendly meal...sometimes you just gotta play with your food.  :)


White Tiger Zebra Cake ~ and other goodies baking in Jennifer's Kitchen ~ Guest Cook Post


I've mentioned my friend, Jennifer, on the blog before.  She is one of the reasons I've got this blog.  It was one innocent comment from her that started it all... BACK STORY ~  When I started posting my dinner photos on my Facebook page, she said one of the meals looked pretty good & would I share the recipe, so I did.  Well, that day in April 2011 - the blogging seed was planted, but I didn't know it yet.  It took me until December 2011 to actually get the blog going, and I've never looked back.  What a quick year it has been!  Here are the very early meal photos, that started it all.   OK, Back Story finished... on with the post. :)

A while back, Jennifer called to tell me about a really cool cake she was baking for her son's 6th birthday.   She was making a ~ Zebra Cake, with a White Tiger theme.  Cool!!  How she explained it to me sounded pretty neat, so I asked her to send me some photos of her making the cake & links for the recipes she used.  Here is what she sent.  I think my son would get a kick out of making this type of cake and it would be a fun baking project for when the winter weather keeps us inside.

So, here are Jennifer's comments on how she created her really cool ~ White Tiger Zebra Cake...

Zebra Cake recipe adapted from here.

- But I added a little sour cream for moisture since my test run came out a little dry.
- Used half kefir/half milk since I like that slight twang it gives.  Plus it's a natural leavener.

Frosting ~ recipe came from the Martha Stewart Coconut Buttercream recipe.
- Didn't use coconut extract but rather added toasted coconut in the filling between the cake with this frosting.  And left it vanilla for the outside of the cake.

Bought the black and orange fondant ~ SatinIce Fondant

 ~ it's tastier than other fondant I've used.

When you slice the cake it does look like zebra stripes and it's not hard to do.  It's visually appealing!

Here are some other tasty treats that have come from Jennifer's Kitchen...


Summertime Peach Ice Cream ~ Jennifer says ~ I tried this since it was so kid friendly and easy.  Not bad.  Not to die for but wow was it easy and quick.  And of course if I didn't have my little helpers, it would have overflowed...


Triple Chocolate Brownies

Jen ~ I thought it would be fitting to end 2012 with a post sharing the goodies from your kitchen since it was a comment from you that got me started sharing recipes for my photos, first on Facebook and now on this blog.  Thanks a million!  (or, should I say just under 1.3 million (pageviews) ~ not too bad for my first year as a blogger :)


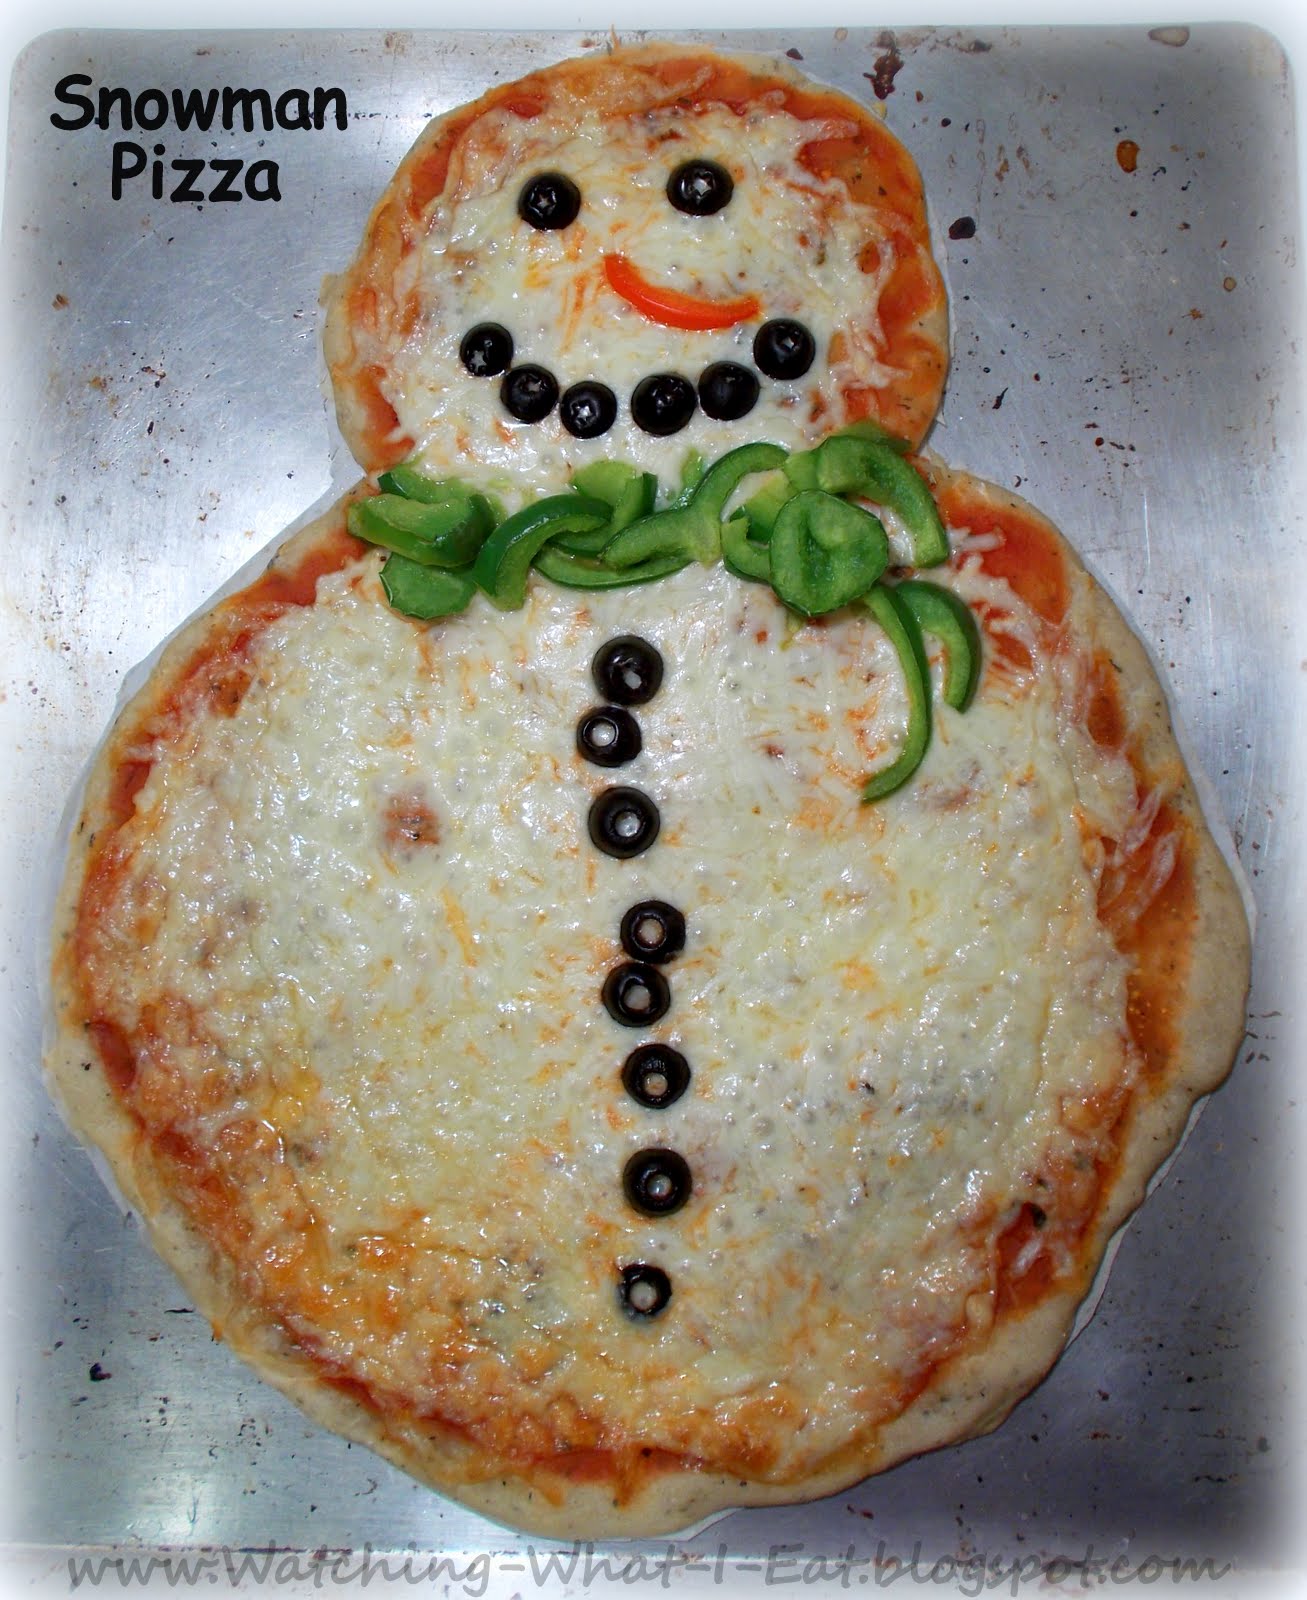
Easy Homemade Snowman Pizza


I recently saw a photo of a pizza shaped like a snowman.  I thought it was too cute and decided to make my own version for a fun holiday meal.


Super easy to make,  I just used a premade herbed pizza dough from Trader Joe's and the usual pizza fixin's.


Then I shaped it like a snowman, decorated it like a veggie-dressed snowman and then baked it following the directions on the bag of dough.


Easy-Peasy!  I just love Snowmen ~ How about you?


Super Easy Peanut Butter Chocolate Kiss Cookies ~ Mimi's 'Magic Trick' Cookies ~ they disappear right before your eyes!

My friend, Michele ~ aka Mimi ~ is a gal who is a challenged baker, just like I am.  She has come up with an easy way to overcome this and shared her secret ~ Peanut Butter Chocolate Kiss Cookie ~ recipe on Facebook the other day.  When I read her comical recipe write-up, I just had to share.
J and I made these cookies today.  They are so simple to make, with hardly any mess and they taste GREAT!  I love it when I can take a couple of store bought ingredients and with just a little kitchen slight-of-hand, turn them into a yummy homemade treat.  Now, that's my kind of baking!!
Mimi, thank you so much for letting us in on your little cookie secret.  You Rock!
Super Easy Peanut Butter Chocolate Kiss Cookies
Ingredients
  • 1 tube of sugar cookie dough 
  • 2/3 cup peanut butter
  • 1/2 bag of chocolate kisses, unwrapped


Directions 

~ Preheat oven to 350F degrees.
~ Mix the sugar cookie dough with the peanut butter until combined.
~ Roll dough into balls (or whatever shape your creative self wants) and flatten slightly.
~ Place cookies on parchment/baking mat lined cookie sheet.
~ Bake cookies for 10-12 minutes or until golden brown.
~ When done, press a chocolate kiss into the top, right away, before they cool. (it's so much fun to keep touching the kisses when they start to melt on the bottom ~ it's hard to know when to stop... :)
~ Enjoy warm or when they cool ~ if you can wait that long.

Now, here's  Mimi's trade secret for the 'Magic Trick'  part of the recipe...
Tell your kids the cookies are ready.  Watch how the cookies magically disappear ~ before they're ever really tasted ~ so ingredients don't matter.  And that folks, is me revealing my favorite illusion.
 Hocus Pocus. No need to focus.  :)
P.S. ~ This is now my favorite cookie recipe.  It took all the mess out of cookie making for us.  J & Roy could care less that they weren't made from scratch.  It was stress free for me, and that means I'll be willing to bake cookies more often.  That will make J happy.  I'm happy with how easy this is and Roy will be happy to eat these tasty, melt-in-your-mouth cookies when he gets home from work.  Mimi is a genius!  Oh, the cookie flavor spins I see with this quick & simple gem of a recipe.  Oh, yeah!

Sharon's ~ No-Bake Double-Decker White Chocolate-Peanut Butter Cracker Cookies


My friend, Sharon, just shared a photo on Facebook of some recent cookie making in her kitchen.  I was so thrilled to learn about her ~ kid friendly, no-bake, easy to prepare and mighty impressive ~ No-Bake Double-Decker White Chocolate-Peanut Butter Cracker Cookie.  It'll be perfect to make over the upcoming winter break with my son.  I was so tickled with how simple this recipe is, that I just had to share it right away.  J will be so thrilled to make these when he gets out of school later this week.  They're made with some of his favorite foods, all dunked & decorated to make a new flavor combo.  Kid + an easy, no~bake cookie recipe = one happy mom!  : )

Sharon, thanks so much for sharing this truly simple recipe that our family will enjoy making ~ You are awesome!

Sharon's ~ No-Bake Double-Decker
White Chocolate-Peanut Butter Cracker Cookies


Ingredients
  • Ritz crackers
  • peanut butter
  • melted white chocolate for dunking the double-decker peanut butter crackers in
  • sprinkles, crushed peppermints, colored sugar, etc. ~ for sprinkling/decorating
Directions 

Take your Ritz crackers, spread one side with a bit of peanut butter.  Top with another Ritz cracker and then carefully dip the 'cracker cookie' into the melted white chocolate, covering both sides.

Once dipped, place on a sheet of parchment paper or waxed paper & sprinkle or decorate to your hearts content.  Allow to dry, then package for gift giving or eating.  If you happen to have any left, (yeah, like that is going to happen around here...) store in a covered container.  Enjoy!

P.S. ~  Sharon says ~ I have tried variations (Nutella, dark chocolate, etc.) and found that these are the most coveted...so I stick with it!

2-Ingredient Pumpkin Pie Mousse

2-Ingredient Pumpkin Pie Mousse ~ My son came up with this sweet and satisfy dessert while helping/playing around in the kitchen with me tonight. Canned pumpkin pie filling and Cool Whip ~ that's it... but it tastes SO good!

I've been tinkering around with recipes using canned pumpkin pie filling.  My son, J, was helping me out in the kitchen & came up with an incredibly simple dessert featuring the aforementioned pie filling.  He begged to lick the spoon, the bowl & the measuring cup ~ he liked it that much.  A cook that enjoys his own cooking... I like that.  :)

This is such an insanely easy recipe and it's perfect for little helpers.  No worries about eating it right from the bowl, spoons or fingers.  You just have to make sure some actually remains in the bowl to chill, that way there's some left for dessert.  heehee

J's 2-Ingredient Pumpkin Pie Mousse
serves 4

Ingredients

  • half of a 30 oz. can of pumpkin pie filling (like Libby's Easy Pumpkin Pie Mix)
  • 1/2 tub Cool Whip of choice, thawed
  • a little extra Cool Whip for topping ~ if desired

Directions

In a medium bowl, gently fold together the pumpkin pie filling and the Cool Whip.  Chill for an hour or so.  Serve in pretty cocktail glasses or bowls.  Garnish with a little extra Cool Whip ~ optional.

Quick English Muffin Pizza

Quick English Muffin Pizza ~ this is a favorite in our house.  It's perfect for when you have to have a meal on the table quick & nothing but pizza will do.  Great for kids & grown-up kids, alike.  :)

J really likes his pizza, but sometimes we don't have the time to bake one from the freezer ~ especially when he wants to eat now!  Waiting for the oven to warm up & then waiting for the pizza to bake, just will not do!  For times like this, I'll often make a Quick English Muffin Pizza.  J just can't resist helping to make his own personal sized pizzas & who can blame him.  It's fun.

I always keep some leftover spaghetti sauce in the freezer, in small bags, just for these occasions.  I'll thaw it out & use it as the 'pizza sauce', giving the split English muffin a thick coating of sauce.  Anything that's in the fridge is fair game as far as the toppings go.  In this picture, I used some leftover, cooked ground beef, with a bit of Italian herbs & some Parmesan cheese.  Just give it a quick spin in the microwave & pizza is served!


Smiley Face Mini Pancakes ~ making anytime, fun time!

Smiley Face Mini Pancakes & 'Faux' Crumpets ~ Depending on which side faces (pun intended) up, you get either a fun to look at & fun to eat pancake that kids love.  Flip it over & you get a 'faux' crumpet, that's great for teatime.

I recently acquired a  ~ Bella Cucina Smiley Pancake Maker, at a yard sale.  We've been having fun making these cute little pancakes, both for breakfast & for after school snacks.  They are quick to make, easy to do, fun to eat & easy to clean-up.  These little golden gems get two BIG thumbs up from J, from Dad & from Mom, too.  They can bring a smile to a little face after a rough day at school & that's a big plus.

I also enjoy making a few extra and saving them for an afternoon teatime treat. (the flip-side looks a bit like a crumpet to me)  The top has a slightly different, chewier texture than the smiley face side, since it doesn't come into direct contact with the top heating element. I spread the flip-side with butter & strawberry jam and enjoy some homemade 'faux English crumpets'.  They make a perfect teatime treat, right here in my American kitchen.  Just don't turn the little guys over & no one would know they're eating smiley face pancakes.  Works for me!  

The hardest thing about using this cute little pancake maker is waiting for the batch to finish, so you can start all over again.   Smiles all around?   Comin' right up! :)


Eggy Bread ~ homestyle comfort food for kids & adults...

Eggy Bread ~ Homestyle comfort food that is perfect for kids & adults alike.  Similar to French Toast, but with fewer ingredients.


I woke up late this morning & as I was coming down the stairs, I was greeted with the aroma of breakfast being cooked in the kitchen.  Roy was making Eggy Bread!  He learned how to make this simple comfort food ~ long, long ago (way back in the 70's) ~ when he was visiting Scotland.  He was staying with his sister, June, & her family.  She introduced him to this easy-to-make breakfast that she was making for her (then) two young sons.  Simple to cook food, that little ones just love.  Eggs, milk, bread & a touch of syrup/butter ~ can't get much easier than that!

This is real-time cooking in our kitchen today.  I've just finished cleaning the kitchen & the dishes are drying.  I think it's cool that Roy was showing J how to make this tasty breakfast ~ even though it'll be a while before he's allowed to use the stove. In my kitchen, it's never too early to learn how things are made, even if you are only just watching for now.  :)


Eggy Bread                               
serves 2-3

Ingredients
  • 4 eggs, well beaten
  • splash of milk
  • 4 slices of your favorite bread
  • Pam cooking spray
  • butter/margarine 
  • your favorite syrup

Directions

Preheat non-stick pan over medium heat. 

Beat the 4 eggs with a splash of milk.


Dunk the bread in the beaten egg mixture until well coated. If you have any extra egg mixture, just dunk some more bread.  :)  Spray pan with Pam cooking spray.


Transfer egg-soaked bread slices to pan & cook until golden brown on first side, then flip over to finish the other side.  About 1-2 minutes per side, depending on how hot your pan is.  When both sides are golden brown, it's done.


Serve with butter & syrup.  Enjoy!


Fried Bologna Sandwiches ~ Be a kid again...but with an adult twist

Fried Bologna Sandwiches ~ Using fat-free or low-fat bologna is one way to still enjoy this retro sandwich favorite ~ for the kid in all of us:)

Martha, my friend whom I've known almost my entire life, was looking at my blog the other day.  She mentioned that she was surprised (tongue-in-cheek, I'm sure) that I hadn't written about one of our favorite meals that we'd cook & eat together when we where kids.   You know, she was right.  What was I thinking?  I decided to get right on it & write about one of the first meals I learned to make when I was allowed to use the stove on my own.  This is a lunchtime meal that we made together when we were kids ~ Fried Bologna Sandwiches.  Cheap & cheerful food from the 70's.   OK, time to indulge my inner kid & enjoy this classic, old-style lunchtime treat once again.  (she also mentioned eating SPAM, but I won't go there again... for anyone :)


Looking back, bologna was a staple from my childhood & probably was for many others, too.  It was a common lunch meat in a school lunchbox & was always available in our icebox (as we used to call it then).   We never counted calories or fat grams in the old days, we just ate whatever was available.  When I was old enough to use the stove & make hot food for myself, I always got a kick out of throwing the slice of bologna straight into the hot pan.  The bologna would bubble & curl up & you'd have to mash it down to get it to fit into the sandwich.  If I was feeling grownup, I'd cut the bologna slice with a 'X', leaving the middle intact, (so it wouldn't curl up) heat it up in the pan & then just slide the perfectly cooked lunch meat onto my bread.  Now that I think about it, I probably cooked it the grownup way when Grandma Bunni was around & the more rustic, kid way, when no one was looking.  Sounds just like something a kid would do, doesn't it?  :)

Of course, way back then, we used good ol' full of fat bologna, butter & regular mayo ~ but that was then & this is now.  So, I'm making my own healthier adult version ~ otherwise I'd never let this sandwich pass my lips again.  It's a splurge, I don't usually eat a lot of processed deli meats, but sometimes you just need to relive the past & live a little.  Sounds just like something a grownup would say & do, doesn't it?  heehee.  With this new version, I can once again be a kid enjoying her Fried Bologna Sandwich.  Thanks for the inspiration, Martha!  Care to join me in the kitchen?   :)

Be a kid again, but with an eye toward lower cal enjoyment!  Tastes & smells like I remember it.  :)   Going lower cal works for me!


Fried Bologna Sandwich ~ (the adult version) ~ Low-fat, Low-cal & Low-carb

  • fat free bologna or low fat bologna ~ as many slices as you like, to make as many sandwiches as you want
  • low-carb bread ~ like Healthy Life Bread ~ 2 slices per sandwich
  • low-fat or fat-free mayo (optional)
  • low-cal margarine (optional)
  • yellow mustard  (optional)
  • salt & pepper, to taste (optional)
  • Butter Flavored Pam cooking spray


Spray skillet with Butter Flavored Pam & heat to medium.

Prepare the bread, 2 slices per sandwich ~ by spreading it with any combo of the following that you like ~ mayo, margarine and/or mustard.

Prepare the bologna ~ Cut an 'X' on each bologna slice , leaving the middle intact OR just throw the slices in & let them bubble up as they will.  (it's OK, no one is watching, :)

Throw in as many slices of bologna as your little heart desires, or that will fit into the skillet. (it's OK, no one is watching  :)


When both sides of the slice(s) are good & hot and starting to get a little color, (they don't get as much color as the full fat version, since they are so low fat) take them out of the pan & put them on the prepared bread.  (if you'd like to have a Grilled Fried Bologna Sandwich, spread a little margarine on both sides of the completed sandwich & finish it in the same skillet ~ just like you would a grilled cheese sandwich)  Add some salt or pepper, if you are so inclined.

Serve the sandwich with an ice cold glass of skim milk & your favorite lower cal chips. (or an ice cold glass of regular milk & the full calorie chips ~ it's OK, no one is watching & I won't tell :)    heehee         Enjoy!

Updated 11/27/2012 ~ 
Robin, a reader of the blog, posted a comment sharing her memory of eating her bologna sandwich with ketchup & mustard, like a hot dog.  Very cool!  I just ran into my kitchen & made myself one - one 1/2 on soft bread & one 1/2 on toasted.   Soft Bread = Hot Dog   and   Toasted Bread = Corn Dog ~ YUM!!

 Robin, thanks so much for sharing your childhood memory.  My son will be getting one of these when he gets home from school today!  
 

Spaghetti Tacos & Spaghetti Nachos ~ iKidding around in the kitchen...


Spaghetti Tacos & Spaghetti Nachos ~ Yeah, right, a meal made from spaghetti & tacos shells ~ t.o.g.e.t.h.e.r??  Who knew there was such a thing?  Turns out, A TON of people know about this dish, especially if you're a Tween & watch iCarley.  Since I have a son, ((who is not a Tween)), who has never seen that show ((me neither)) I had no idea such a thing existed.  I just learned about it while surfing the Internet, innocently looking for new recipes using leftover spaghetti.  ((I had some leftover spaghetti, from when I made my brother's recipe, Mike's Homemade Spaghetti Sauce))  I was shocked to read so many compliments for the Spaghetti Taco recipe.  The NY Times has even written quite the article to explain the phenomenon...AND there are TONS of videos on YouTube of this crazy dinner dish.  As I said before...Who knew??   This is what I found on YouTube from the actual show...


There is even a recipe for a lower calorie version from the Hungry Girl site...  Well, if she can make them, I guess they can't be too bad...

I was skeptical, to say the least, but I do like to get creative with my leftovers, so I decided to give this dish a try.  Happy to report, they really do make a perfect match.  Spaghetti  + Tacos = 1 Happy Kid/Mom!  It's a cheap & cheerful meal, especially if you are using up leftovers.  Another great thing about them is you get Cool Mom Bonus Points for making them.  Alright!  J loved them & actually, so did I.  In a pinch you could even used canned spaghetti & heat the tacos in the microwave.  Dinner on the table in 5 minutes, too cool!


We even came up with our own spin, we made Spaghetti Nachos.  Some of the taco shells were cracked, so we just topped them with spaghetti, shredded cheese & heated them in the oven until the cheese melted.  I think we even liked it better that way.  After all of this, maybe we'll even catch a rerun of the show or maybe next time we make Spaghetti Tacos or Spaghetti Nachos we'll even save some for Dad to try....just maybe.  :)

Banana Oat Breakfast Cookies

Banana Oat Breakfast Cookies ~ What a healthy, simple & FUN way to eat breakfast.  Made with oatmeal, applesauce, toasted walnuts & raisins. They make a wonderfully chewy cookie.   ((I have included the optional dried cranberries in the breakfast cookies that are pictured, but of course, you can just use all raisins if you don't include the use of dried cranberries in your diet.))


I saw a photo for Breakfast Cookies over on Pinterest & just had to 'pin' it & try baking it.  The recipe only had a few ingredients and had no sugar added & was egg, flour & dairy free!  Of course, I tweaked it a bit, as I always do.  These turned out really good & would make a perfect breakfast-on-the-go!!  Heck, they would be a good guilt-free, anytime snack.   I love it when I find recipes that are so good for you & so easy to make.  I think I will be tinkering with this adapted recipe some more, I'm sure there are many additional ways to spin this breakfast cookie.  You could easily add some ground flax seed, protein powder or other dried fruits & nuts...the possibilities are endless.  Both Roy & J gave them two-thumbs up & I make it three.  Enjoy!

Updated 7/5/2012 ~ I just did a nutritional workup for the Banana Oat Breakfast Cookies over at CalorieCount.com ~ you can link over to view the stats here.

Updated 7/9/2012 ~ In the last few days, my Banana Oat Breakfast Cookies recipe has gone viral!  I appreciate all of you who have visited my site & who have made comments.  For those who are concerned about the recipe including cranberries, I have more clearly noted their use in the recipe as optional since most dried cranberries do have some sugar added in their processing.  Enjoy!   


Banana Oat Breakfast Cookies ~ no sugar added ~ egg, flour &  dairy free!!
makes 12 BIG breakfast cookies 
or 16 regular sized 

Ingredients
  • 1 1/2 cups oatmeal, quick or old fashioned ~ uncooked
  • 2 ripe bananas, mashed with fork until creamy  **(see update below)
  • 1 cup unsweetened applesauce
  • 1/3 cup raisins, or to taste ((optional ~ you can add in some dried cranberries (replacing some of the raisins) if you include the use of dried cranberries in your diet.  Trader Joe's makes a really good one.))
  • 1/4 cup chopped walnuts, toasted (or regular, if you prefer) ***(see update below)
  • 1 tsp vanilla extract
  • 1 tsp cinnamon (or more, to taste) 

    ** for those of you who don't like bananas, try using 2/3 cup pureed fresh or frozen mango in place of the mashed bananas. I've used it in place of the bananas & it's an acceptable substitute, just maybe not quite as sweet. 

           ***for those of you who don't eat nuts, just make the recipe without
           them.  No need to replace them with anything else.


Directions

Preheat heat oven to 350 degrees.

Mix vanilla extract & cinnamon into the applesauce.

Blend applesauce mixture with all other ingredients & let sit for 10 minutes

Drop cookie dough, by spoonfuls, onto a parchment paper lined cookie sheet & flatten cookies into rounds.

Bake approx. 20 - 30 minutes, or until golden & done.

Remove from oven & let rest on cookie sheet for 5 minutes, then move to cooling rack.
 
Store in a covered container when completely cool.

Enjoy for breakfast, for an afternoon snack with tea/coffee or just about anytime!


Updated 6/9/2012:  I've been baking this basic Breakfast Cookie Recipe for almost two months & it has become a staple in my kitchen.  No joke, I make a batch about every three days.  We decided we like it when I use the old fashioned oats the best, but since I can buy the quick oats in bulk at Sam's Club I still make it with that type as well.  We eat them as a snack, dessert, with tea or coffee, in lunchboxes or when we just need a little something before a meal ~ they are now our go-to if we need a quick bite.  Here are some other ways to enjoy my Breakfast Cookies...


Still tinkering with how we eat them, that's half the fun...  :)  Occasionally I like to splurge & include a little extra 'something' to my breakfast cookies. Sometimes I'll shape the cookies into 'bars',  melt some carob chips & add squiggles on the cookie bars.  J REALLY likes them like this, I think it makes him feel like he's getting a chocolaty, chewy cereal bar. ~ OR ~ I will sometimes add a few carob chips to the top of the cookies before I put them in the oven, pushing them down into the dough a bit, so they stay put.  Roy likes them like this as a change, he feels it makes them eat like a chewy chocolate chip cookie.


To see this recipe & post, click below ~
Carrot Cake Breakfast Cookies ~ with banana & oats


To see this recipe & post, click below ~
Cocoa Banana Oat Breakfast Cookies 


To see this recipe & post, click below ~ 
Blueberry Almond Banana Oat Breakfast Cookies


To see this recipe & post, click below ~
Peanut Butter Banana Oat Breakfast Cookies


To see this recipe & post, click below ~
Tropical Coconut Mango Breakfast Cookies


To see this recipe & post, click below ~
Double Cherry Carob Chip Breakfast Cookies


To see this recipe & post, click below ~
Double Apricot Almond Breakfast Cookies


To see this recipe & post, click below ~
Peanut Butter Oatmeal Raisin Breakfast Cookies


To see this recipe & post, click below ~
Overnight Oatmeal Cookie Dough Breakfast Cookie ~ No Bake


Related Posts Plugin for WordPress, Blogger...