Showing posts with label cake. Show all posts

Lemon-Glazed Madeleines


I'm an armchair traveler at heart, and I especially love reading cookbooks that express the heart and soul of other peoples, places and cultures. One of my recent 'seat-side travels' has been to France, where I dropped in on Paris, via this spot-on book by David Lebovitz ~ The Sweet Life in Paris. It's not only full of good recipes, but it's also full of funny stories regarding his trials and tribulations of being an American expat, living abroad in a place that is home to that, je ne sais quoi, way of looking at life.  OK, who's kidding who... it's the (in)famous French attitude that he does battle with on a daily basis. Some times you win, some times you lose...but it's always a treat.

I've so enjoyed picking and choosing some of his recipes to create in my own stateside kitchen, and I've also enjoyed eating them all and sharing some of my creations (some just never made it past me and my mouth). My favorite so far has been his recipe for ~ Lemon-Glazed Madeleines. I was so inspired to make these little French treats toute suite, I just had to order my own madeleine tin online, late on a Friday night, after reading his story/recipe. I must say, they were a HUGE hit, and I highly recommend this recipe for these lovely, little seashell shaped, lemon-kissed gems if you're ever looking for a little bit of the sweet life from Paris...in your own kitchen...without the cost of airfare...or the (in)famous French 'tude. Bon Appétit! 

Homemade Minion Cake & Cupcakes ~ making a birthday fun!


Our friends, Cheryl & Bill, recently baked up some Minion birthday fun for their grandson's big day.  To help make his birthday cake extra-special, they searched for inspiration on Pinterest, as so many of us do, looking at all the different varieties of Minion cupcakes & Minion sheet cakes that other families have made.  They decided to make lots & lots of Minions, both big & small. I just love the adorable homemade treats they came up with.

Thank you so much for sharing your Minions with us ~ we really enjoyed them!!  You guys ROCK!  :)


To make the Minion cake they:  trimmed up one end of a sheet cake to get the correct Minion shape.  Cut the 'nose & bushy eyebrows' off of a pair of silly kids party glasses to make the perfect, easy to use goggles.  Peanut Butter Cup buttons, colored icing & licorice whips helped finish off this Minion cutie.

To make these Minion cupcake cuties they used:  Confetti cake/cupcake mix, topped with leftover blue icing from the cake above. Then they stuck 1/2 a cut Twinkie on top of the icing & created the Minion with ~ bits of cut black licorice whip for their hair 'stubble & some bought 'candy eyes' that they attached with a bit of chocolate icing to create their goggled look.  So adorable!


Quick & Easy Blueberry-Peach Cake


We were all craving something sweet and fruity the day I made/threw together this simple dessert.  It's not quite a cake, not quite a cobbler, not quite a pie ~ but is sure was tasty.  Since I used a boxed 'cake' mix, that is what I'm going to call it. (I'd have called it a fruit cake...but, that sweet always gets a bad rap, so I decided not to go there :)   I used what I had available in the fridge/pantry, and was really happy with the results.  Super quick & easy.  Score one for Mom!


Quick & Easy Blueberry-Peach Cake

Ingredients
  • one box of Jiffy yellow cake mix, prepared according to box instructions
  • 1 large can peaches (approx 29oz), drained/sliced
  • 2 cups of fresh blueberries
Directions
Preheat oven to 350 degrees.  Prepare the cake mix according to box instructions & set aside.  Spray a cake pan with Pam, add the fruit to the pan, pour the batter over the top & gently shake to get the batter all around the fruit.  Bake for about 35-40 minutes or until the cake is golden brown and a toothpick comes out clean.  Enjoy.


Savory & Sweet French Picnic Cake ~ inspired by a recipe from 'The Little Paris Kitchen' cookbook


Not too long ago, I checked out a copy of the cookbook ~ The Little Paris Kitchen ~ from our local library.   It's a charming cookbook that was written by a Brit named ~ Rachel Khoo ~ who now lives in Paris.  I truly enjoyed reading about all the back stories on the recipes, how the cookbook came to be, as well as looking at all the beautiful photos of Rachel out-and-about in Paris.  Yeah, I'm one of those people, one who reads cookbooks like other people read novels.  :)


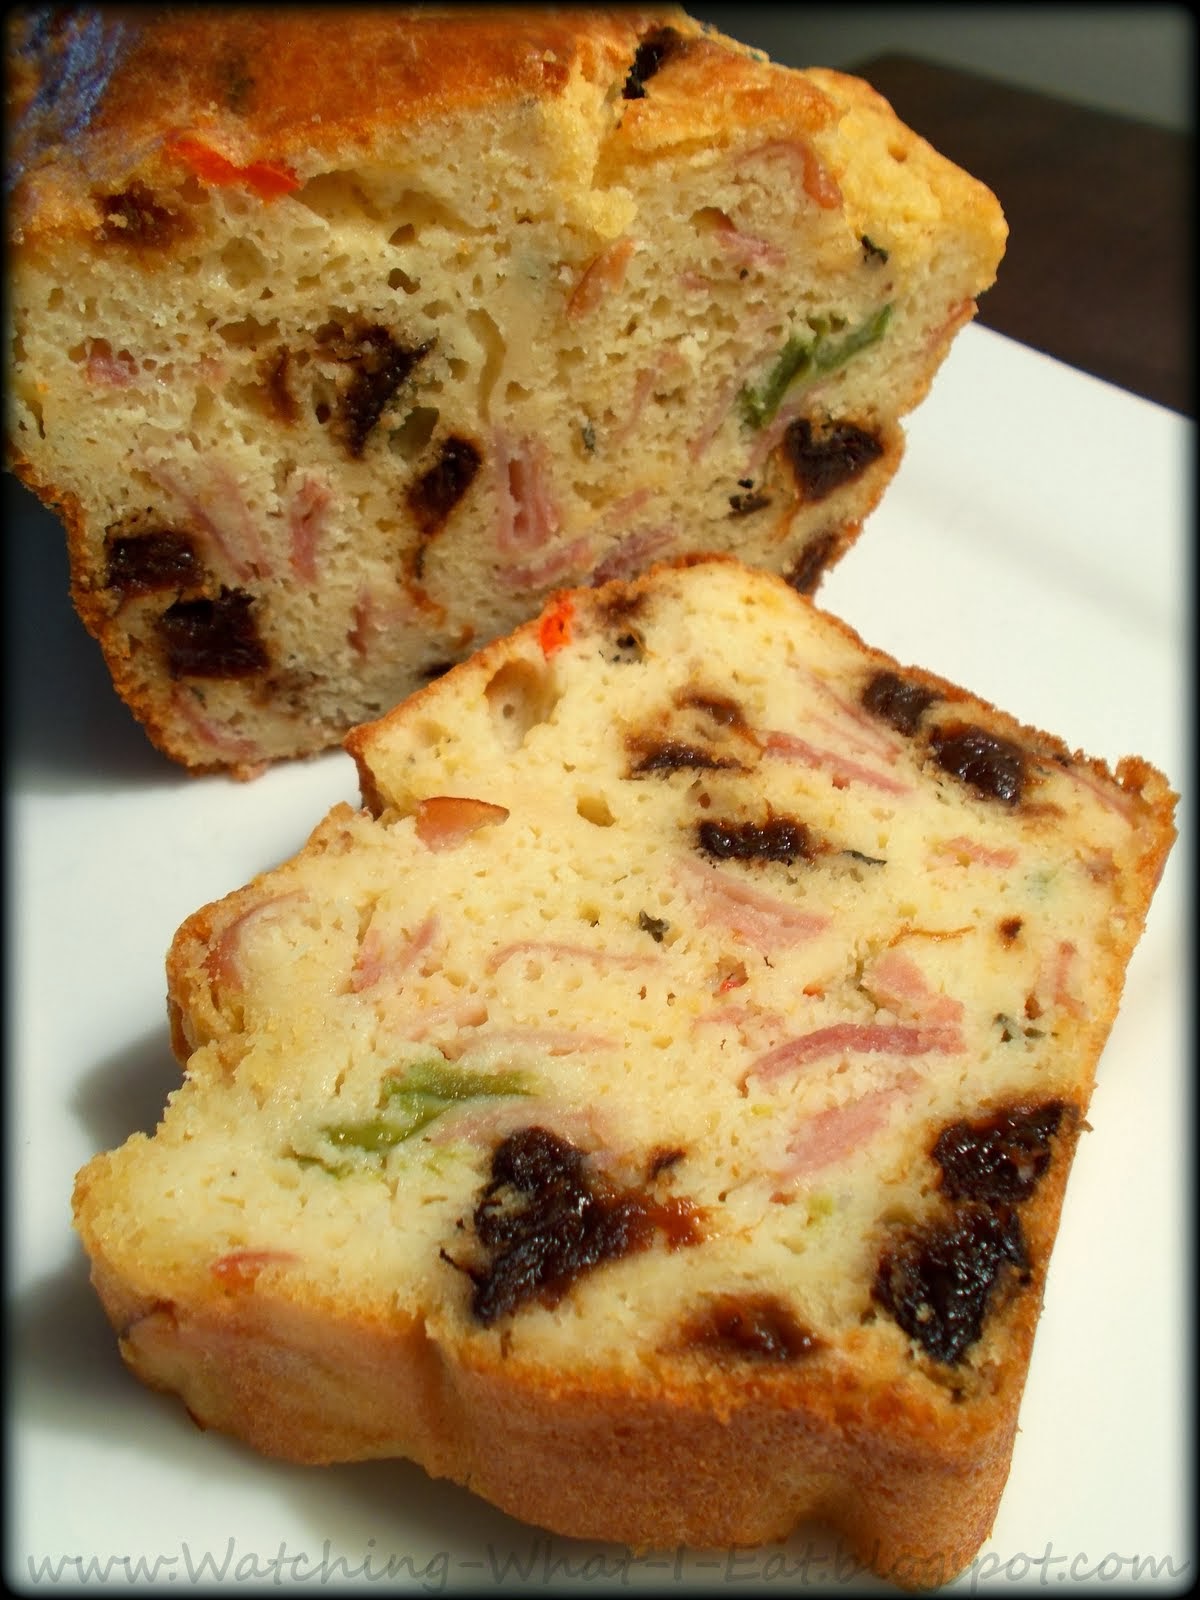
One of her recipes that called out to me was for a savory, yet slightly sweet, 'picnic cake' called ~ Sausage, Pistachio & Prune Cake.  I know it sounds kinda odd, but after reading her comments about it, I just had to make it in my kitchen, too.   I tinkered with the recipe just a bit... I cut the oil in half by using water to replace half the oil (with no loss of flavor or moisture); I used chopped ham, bell pepper and onion instead of the amount of salami called for; I replaced 1/3 cup of wheat flour with soy flour, to get a little more protein in the cake; skipped the nuts; and I only used half of the amount of chopped dried plums (I like calling them that instead of prunes, prunes just sounds so ~ ugh! :)   The cake came out with a beautiful golden crust and was excellent.  Roy thought it was like eating a quiche, but in a slightly sweet, cake/loaf form...and I'd have to agree.  We enjoyed it for a light lunch, with a garden salad and fresh fruit.  I also had it for breakfast the next day, too ~ Yummy!  Even my son liked it.  He was a bit hesitant at first, but after a few bites he really got into it and promptly asked for seconds.  So, if you're looking to do a little foodie armchair traveling, give this book or recipe a try ~ Bon Appétit!


2-Ingredient Pumpkin Cake with Apple Cider Glaze


Have you ever seen a Pinterest 'pin' and just had to make it in your own kitchen?  Yeah, me too.  I followed a pin to this 2008 recipe blog post for a~ 2-Ingredient Pumpkin Cake with Apple Cider Glaze. It sounded way too good to pass up.  The cake is made with just a box of cake mix and a can of pumpkin puree, that's it.  The recipe includes a simple glaze made from powdered sugar and apple cider, just in case you want to make it extra special.  Nice!


The verdict: My family and friends liked the cake.  I think the cake is better the first day because it seemed to get a bit 'gummy' by the second day...but that didn't stop us from enjoying seconds.  The sticky batter reminds me of a cross between Play-Doh & Marshmallow Fluff...interesting, to say the least.  It wasn't possible to get the batter level, so the cake had a bit of a 'rustic' look to it when it came out of the oven, but the glaze helped to smooth out the uneven appearance of the top, so you don't really notice it that much.  For a cake that doesn't have any eggs or oil in it, it was all right.  That being said, I'm not sure I will ever make it again...but I'm happy that I tried it.  I'm always up for trying a new recipe, and now I know if I only have a can of pumpkin puree and a box cake mix in the pantry, I can still make a tasty dessert. :) 


Pineapple Upside-Down Oat Bran Breakfast Cake


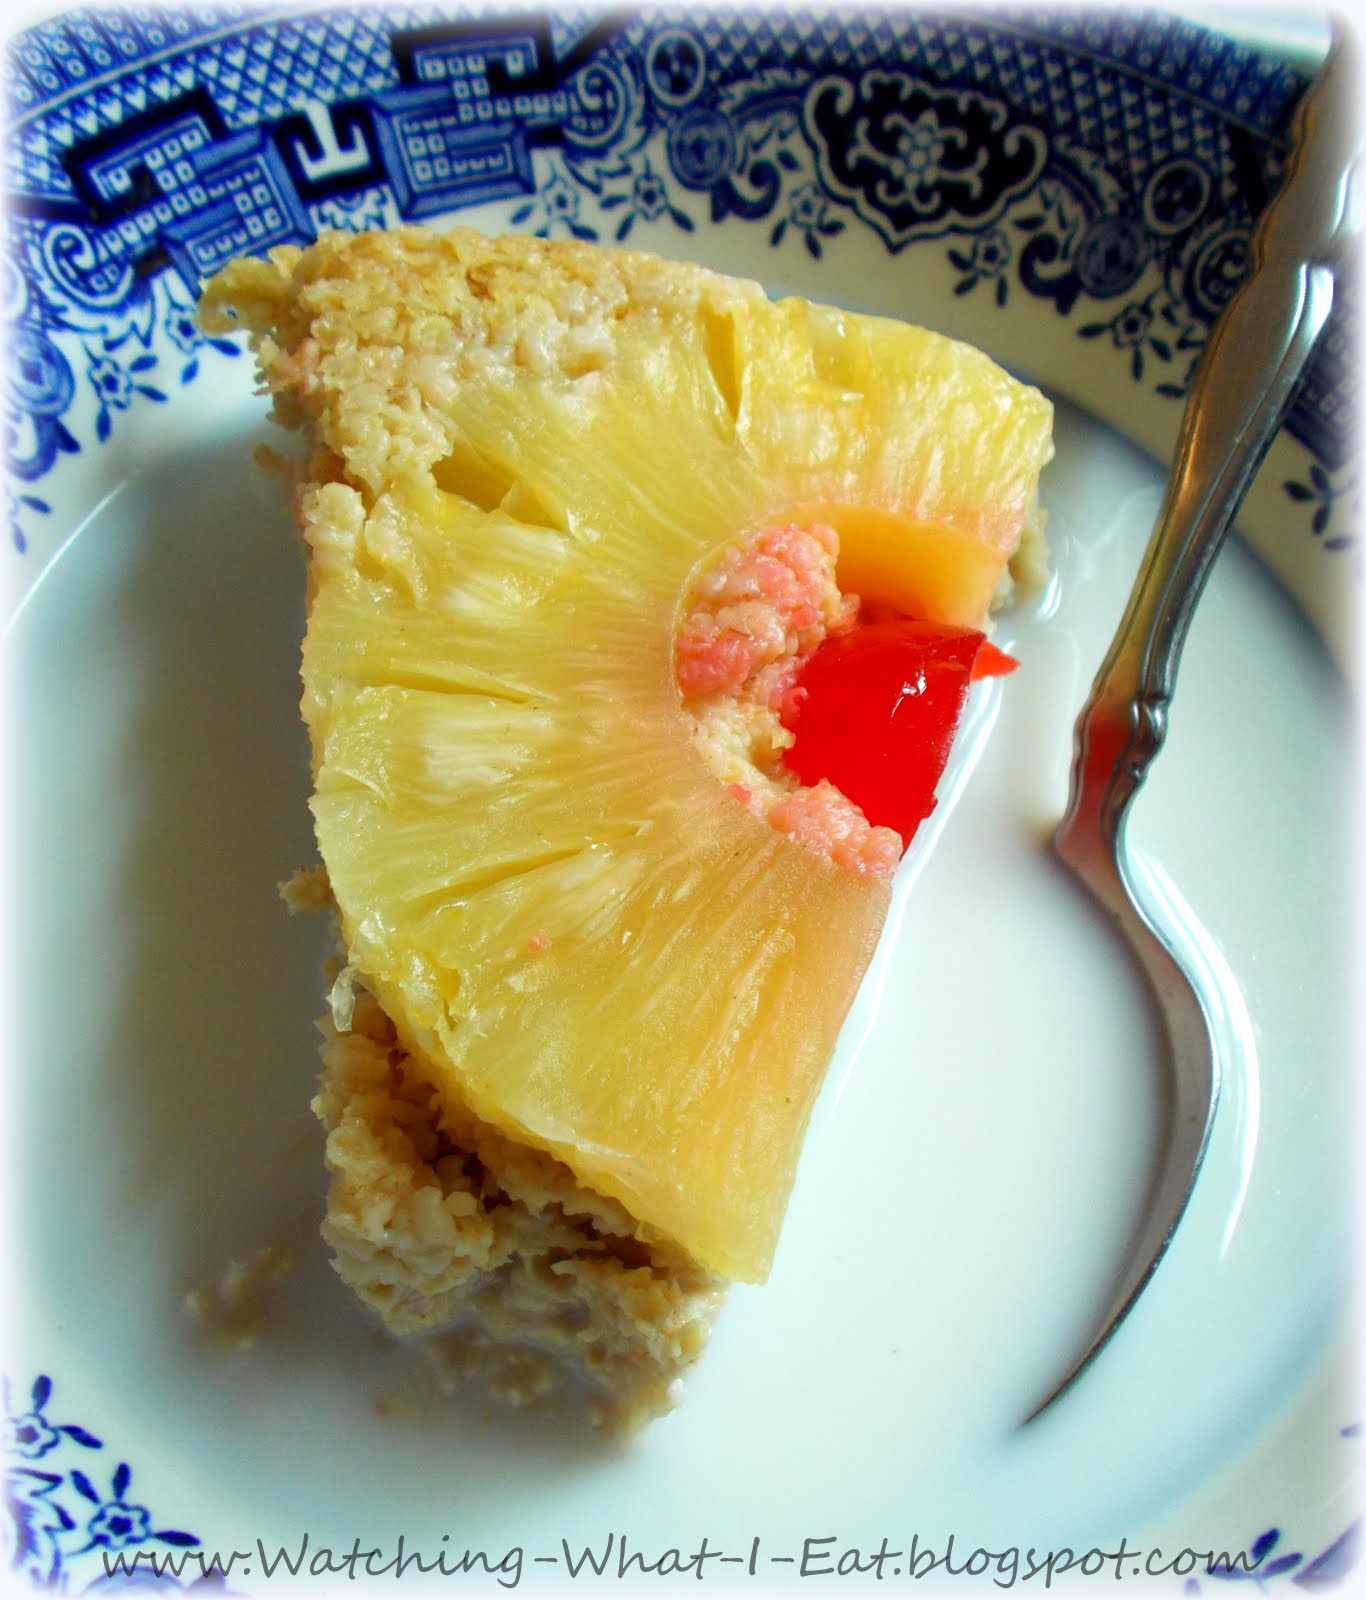
I was looking through my copy of ~ The 8-Week Cholesterol Cure ~ and decided to make the recipe for the Pineapple Upside-Down Oat Bran Muffins.  After reading the recipe, I opted for the 'cake' version instead, which includes pineapple rings and maraschino cherries.  Below is my adapted version, with a few changes/additions to the recipe...I used just one egg instead of two egg whites, 2% milk (it's what I had on hand) instead of skim milk and I added vanilla extract and cinnamon for a little extra flavor.


When it came out of the oven it looked like a traditional pineapple upside-down cake ~ but it tasted more like a super thickened, cake'ish baked oatmeal to me.  Not surprising really, since it is made mostly of oat bran.  I was thinking I had a pretty flop on my hands.  I refuse to let food go to waste around here, so I decided to serve it anyway.  I decided to tinker with it, and when I presented it to my family as a 'pineapple-oat breakfast cake' (served warm, in a bowl with milk and a small drizzle of maple syrup) ~ it was an unexpected hit with both my husband and son!  My hubby liked it so much that he also ate it for dessert ~ this time chilled, with a scoop of light ice cream and a splash of milk.  So, with a bit of creative embellishing, it works as both a breakfast and a dessert.  Cool, score one for Mom!

Pineapple Upside-Down Oat Bran Breakfast Cake
makes 8-12 servings
adapted from the book ~ The 8-Week Cholesterol Cure

Ingredients
  • 2 1/4 cups toasted oat bran  (I used Trader Joe's toasted oat bran)
  • 1/4 cup brown sugar
  • 1 Tbsp baking powder
  • 1/2 cup milk (low fat or skim)
  • 2 - 8 oz. cans crushed pineapple in its own juice (unsweetened)
  • 1 egg
  • 2 Tbsp vegetable oil
  • 1 tsp vanilla extract
  • 1 tsp cinnamon
  • 7 pineapple rings, drained
  • 7 maraschino cherries, drained 
Directions
Preheat oven to 425 F.  Spray a round cake pan with Pam, place drained pineapple rings in a single layer on the bottom, add one maraschino cherry in the center of each pineapple ring and set pan aside.  Mix the oat bran, brown sugar, baking powder and cinnamon in a large bowl.  Mix the milk, 1 can of crushed pineapple with juice, egg, vanilla extract and oil in a blender for 10 seconds.  Combine the wet and dry ingredients in the bowl and mix thoroughly.  Drain the second can of pineapple and stir into the bran mixture.  Pour oat bran mixture into cake pan.  Bake for approx. 30 minutes or until cake is cooked through.  Turn out the cake pan onto a cooling rack or a large, flat plate and allow to cool.  Cut into wedges and serve warm or cold.  Serving suggestions ~ warm ~ eat it plain or with milk and a little maple syrup for breakfast; and ~ chilled ~ with milk and light ice cream or with a little whipped cream for a dessert version.  Store in fridge.


No-Bake Pizzelle Strawberry Layer Cake


I bought a near-new pizzelle maker at Goodwill a few weeks ago.  I've been searching the web, looking for healthy(er) pizzelle recipes and kept seeing how pizzelles are often one of the cookies served at an Italian Easter celebration, so I thought it would be fun to make a batch for the upcoming Easter holiday.  I found this basic recipe and tweaked it a bit.  I replaced half the flour with whole wheat pastry flour, used only egg whites, replaced the anise extract with vanilla extract and used avocado oil instead of the butter.  The pizzelles turned out OK, but were not great.

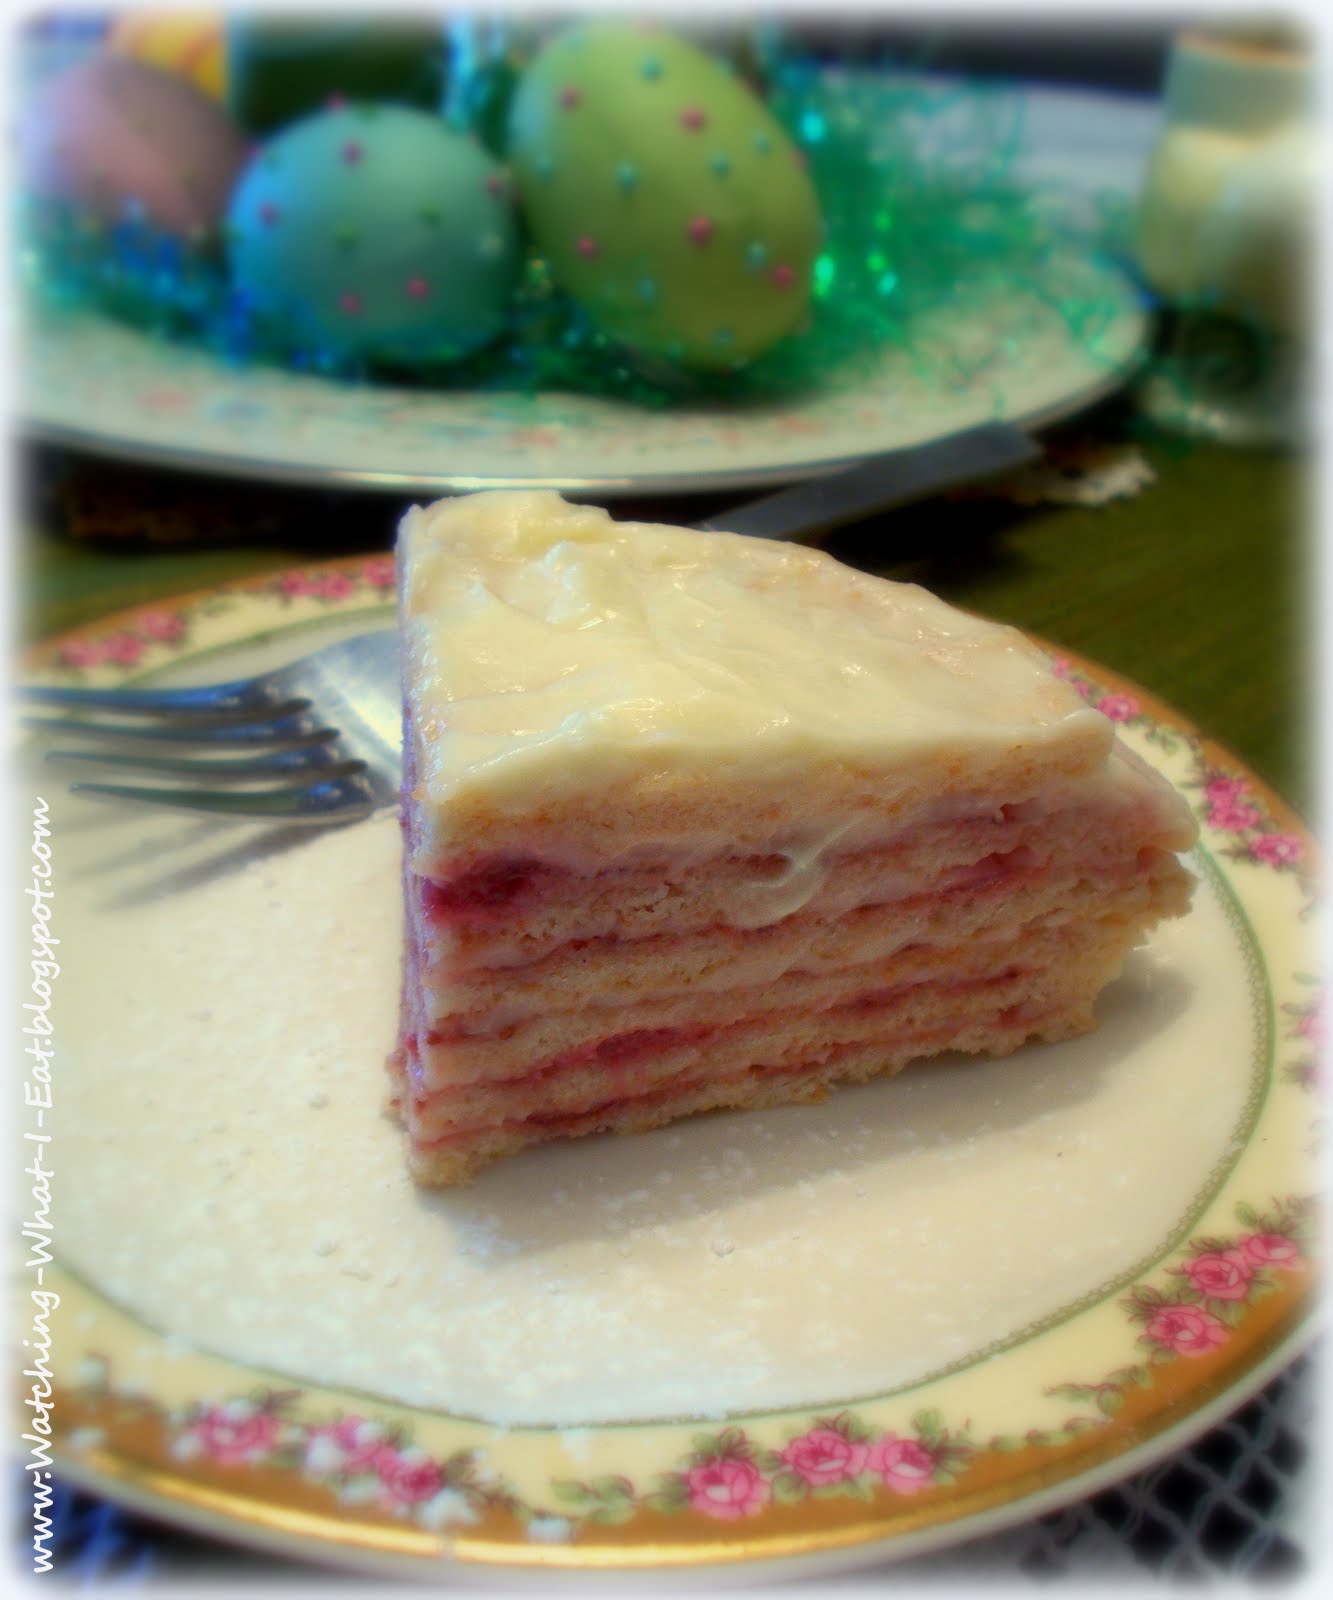
Since I had so many cookies, I started looking for different ways to use them, and came across this site that gave a recipe for a pizzelle pie.  Hmmm... Sounded interesting, so I tinkered with it a smidgen and made my own adapted version.  We really liked it, so much so, that I'll be making another No-Bake Pizzelle Strawberry Layer Cake for our Easter dinner.   I see endless possibilities with this no-bake dessert.  Guess I'll need to perfect that healthier pizzelle recipe, not for the cookie's sake...but for the cake's.  :)

No-Bake Pizzelle Strawberry Layer Cake
serves 2-4

Ingredients
  • 5 to 7 pizzelle cookies ~ or as many as you want, to get it as high as you want (homemade or store bought, anise or vanilla flavored ~ as you like)
  • 1 small box of vanilla instant pudding mix, prepared according to box directions (or flavor of choice ~ regular or sugar-free)
  • strawberry jam or jam flavor of choice (I used homemade ~ see my post on my homegrown/homemade strawberry jam from last year)
  • powdered sugar for dusting or whipped cream for topping (optional)  


Directions
Spread about 2 teaspoons of jam on the top of each pizzelle, all the way to the edge. Place first jam covered cookie in a suitable container*, then spoon over about 1 1/2 - 2 Tablespoons of vanilla pudding, on top of the jam, smoothing all the way to the edge.  Place next jam covered cookie on top of the now pudding covered cookie and continue layering this way until you are all done, ending with a pudding covered cookie on the top.  Cover the now completed 'layer cake' and let it sit in the fridge overnight.  It will begin to absorb the moisture from the jam/pudding and turn into a pretty and delicate looking layer cake.  Cut into wedges and serve with a dusting of powdered sugar or top with whipped cream, if desired.

*if you want to be able to remove the layer cake easily for presentation, place a strip of plastic wrap in the bottom of the container, with the edges hanging over the edge of the container and use that to lift the whole layer cake out when ready to serve the next day.


I think this would be good with a tiramisu spin, or maybe with marmalade and some type of liqueur ~ the possibilities are endless.  I really like the idea of making it the night before and just pulling it out of the fridge when you need it.  A no-fuss, no-stress dessert, I like that!    

Happy Easter ~  From our family to yours!


Meyer Lemon Honey Almond Cake


A few weeks ago, I was tinkering around with a lemon cake recipe that I made/posted about last year, trying to see if a bit simpler method would yield a more lemony cake.  Happy to report, the new lemon cake was even more full of the sweet/tart goodness of my favorite citrus ~ the Meyer lemon.  More changes that I made to the original recipe were ~ using all egg whites this time around, replacing some of the sugar with honey and pureeing the Meyer lemons fresh (not cooked), peel-and-all.   It made for a bright, robust flavor that I really enjoyed.  This Meyer Lemon Honey Almond Cake is wheat-free and dairy-free.  It's a really enjoyable dessert, tasty teatime treat or snack for us.  If you wanted to add a little something extra, maybe drizzle on a quick glaze or a sprinkling of powdered sugar to dress it up, or eat it plain/naked.  teehee  :)  Enjoy!

Meyer Lemon Honey Almond Cake
adapted from this recipe
Ingredients
  • 3 Meyer lemons ~ cut into wedges & seeds removed
  • 2 1/4 cups almond meal
  • 1 cup egg whites (I used eggs whites from a carton)
  • 7 Tbsps sugar
  • 1/4 cup honey
  • 1 tsp vanilla extract
  • 1 tsp baking powder
  • pinch of salt

Directions
Preheat oven to 350 degrees.   Grease a cake pan and cut a piece of parchment paper to fit into the bottom. (so it will be easier to remove)

In a small food processor, puree Meyer lemons (skin & all) with honey until smooth.  Combine the pureed honey/lemon with the sugar, egg whites, vanilla extract and salt and stir until smooth.  Pour into a mixing bowl and add the almond meal and baking powder, stir until well combined.

Let batter sit 10 minutes, then pour into prepared cake pan and tap/smooth batter.  Bake for approx 40-60 minutes or until toothpick tester comes out clean.  Let cool in pan, run a knife around edges to loosen, then remove to cooling rack.  Or, just keep in the cake pan and serve from there.  Cake will get moister the longer it sits.  Store in a covered container, it will last longer if kept in the fridge. 


Sweetheart Apple-Caramel Cupcakes

Sweetheart Apple-Caramel Cupcakes ~  Super quick & easy, made from a box of Duncan Hines Decadent Apple Caramel Cake Mix.  Perfect for any occasion, but really pretty when dolled up for Valentine's Day!

Today, when Roy and I returned from a pre-Valentine's Day lunch date, we found a sweet surprise waiting for us on our front porch.  Our dear family friend, Dick, had brought over a plate full of Sweetheart Apple-Caramel Cupcakes! (that's my name for them, since he is such a sweetheart!)

Super Easy Chocolate Cherry Cordial Brownie ~ Perfect for Valentine's Day!


I fell head-over-heels in love with the Chocolate Cherry Cordials Cookies that Kathleen baked for the TWIGS Soup Dinner I went to (& posted about) recently.  So much so, that I decided to tweak my favorite Trader Joe's boxed brownie mix to see if I could get a similar flavor.

Jen's 'Little Treasures' Carrot Cake ~ Celebrating National Carrot Cake Day, February 3rd! ~ a Guest Cook Post from Jennifer's Kitchen


My friend, Jennifer, shared her family's favorite carrot cake recipe with me, complete with photos.  Since February 3rd is National Carrot Cake Day, I thought today would be the perfect day to post her recipe on the blog.  So, here it is, in her own words on how her traditional, tempting, fruity, rich and spicy carrot cake came to be.  Enjoy!

Celebrating New Year's Day ~ Pennsylvania Dutch Style ~ Guest Cook Post


Our friend, Barbara, invited us over to her home to celebrate New Year's Day.  She made her traditional New Year's family meal, full of Pennsylvania Dutch flavors.  We had a fantastic time, enjoying ~ great conversation; beautiful winter views on the lake; a home full of holiday spirit; great food and wine; and delightful desserts.

Barbara, thanks again for inviting us to share in your family's tradition!  What a wonderful way to start the New Year.   x/o


I didn't get Barbara's actual recipe for the dessert she made, but, I did find recipes for Apple Crisp with Pecans and for Homemade Vanilla Bean Ice Cream that sound pretty close to the flavors of the desserts we enjoyed.


As you can see from all the photos, Barbara is a marvelous cook and hostess.  Everything she prepared was wonderful.  My son was all over the baked brie and Barbara also made him some homemade root beer that he went nuts for.  Now he wants me to buy one of those do-it-yourself soda machines, too.  :)  Between me and my foodie friends, I think we're teaching my young son to be a budding gourmand... and that's a good thing!   Here's wishing everyone a fantastic 2013!
 

White Tiger Zebra Cake ~ and other goodies baking in Jennifer's Kitchen ~ Guest Cook Post


I've mentioned my friend, Jennifer, on the blog before.  She is one of the reasons I've got this blog.  It was one innocent comment from her that started it all... BACK STORY ~  When I started posting my dinner photos on my Facebook page, she said one of the meals looked pretty good & would I share the recipe, so I did.  Well, that day in April 2011 - the blogging seed was planted, but I didn't know it yet.  It took me until December 2011 to actually get the blog going, and I've never looked back.  What a quick year it has been!  Here are the very early meal photos, that started it all.   OK, Back Story finished... on with the post. :)

A while back, Jennifer called to tell me about a really cool cake she was baking for her son's 6th birthday.   She was making a ~ Zebra Cake, with a White Tiger theme.  Cool!!  How she explained it to me sounded pretty neat, so I asked her to send me some photos of her making the cake & links for the recipes she used.  Here is what she sent.  I think my son would get a kick out of making this type of cake and it would be a fun baking project for when the winter weather keeps us inside.

So, here are Jennifer's comments on how she created her really cool ~ White Tiger Zebra Cake...

Zebra Cake recipe adapted from here.

- But I added a little sour cream for moisture since my test run came out a little dry.
- Used half kefir/half milk since I like that slight twang it gives.  Plus it's a natural leavener.

Frosting ~ recipe came from the Martha Stewart Coconut Buttercream recipe.
- Didn't use coconut extract but rather added toasted coconut in the filling between the cake with this frosting.  And left it vanilla for the outside of the cake.

Bought the black and orange fondant ~ SatinIce Fondant

 ~ it's tastier than other fondant I've used.

When you slice the cake it does look like zebra stripes and it's not hard to do.  It's visually appealing!

Here are some other tasty treats that have come from Jennifer's Kitchen...


Summertime Peach Ice Cream ~ Jennifer says ~ I tried this since it was so kid friendly and easy.  Not bad.  Not to die for but wow was it easy and quick.  And of course if I didn't have my little helpers, it would have overflowed...


Triple Chocolate Brownies

Jen ~ I thought it would be fitting to end 2012 with a post sharing the goodies from your kitchen since it was a comment from you that got me started sharing recipes for my photos, first on Facebook and now on this blog.  Thanks a million!  (or, should I say just under 1.3 million (pageviews) ~ not too bad for my first year as a blogger :)


Zucchini Spiced Pumpkin Oat Bread

Zucchini Spiced Pumpkin Oat Bread ~ A blend of the classic zucchini bread and traditional pumpkin bread.


My friend, Trina, is a gifted photographer, great cook & a foodie.  I asked her for a recipe she would like to share on the blog, and she was kind enough to give me her recipe for zucchini bread.  Since I'm still craving all-things-pumpkin, I decided to tweak her original recipe (just a bit) to include some of that golden fruit I just can't seem to get enough of.  Then, I figured as long as I was tinkering, I might as well add some oatmeal & few other goodies.  So my recipe for ~ Zucchini Spiced Pumpkin Oat Bread ~ is a hybrid from her kitchen, to my kitchen, to your kitchen.  Little tip ~ If you can hold off on eating the bread until it has had a chance to cool completely, then let it sit well-wrapped, for a few hours ~ the flavors & texture will develop more and make the bread even better.

I've gotta say, I just love the little emerald green flecks of the zucchini combined with the deep golden orange of the pumpkin.  It just looks so pretty and smells so good with all the spices, raisins & nuts.  This delightful bread will be enjoyed by all of us with our morning/afternoon/evening tea (we drink A LOT of tea around here! ~ English hubby :).  Hope you enjoy this unique spin on the classic zucchini bread... or is it an unusual spin on the traditional pumpkin bread?  heehee


Zucchini Spiced Pumpkin Oat Bread
makes one loaf


Ingredients
  • 1 cup all-purpose flour
  • 1/2 cup ground oatmeal 'flour' ~ (grind a 1/2 cup of quick oatmeal in a food processor or blender until it becomes 'flour-like')
  • 1 tsp ground cinnamon
  • 1/2 tsp nutmeg
  • 1/2 baking soda
  • 1/4 tsp salt
  • 1/4 tsp baking powder
  • 1/4 tsp allspice 
  • 1 large egg, beaten
  • 3/4 cup sugar
  • 3/4 cup finely shredded, unpeeled zucchini 
  • 3/4 cup canned pumpkin puree
  • 1/4 cup cooking oil
  • 1/4 cup raisins
  • 2 Tbsp chopped walnuts (toasted if you like)
  • Optional topping ~ 1/2 Tbsp raw oatmeal, a sprinkling of sugar & a light spray of Pam


Directions

Preheat oven to 350 degrees F.  Grease an 8x4x2-inch loaf pan; set aside.

Mix first 8 ingredients (flour through allspice) in a medium bowl, until well combined.

Take one Tbsp of the flour mixture & in a small bowl/cup, toss the raisins & nuts to coat thoroughly with the flour. (this will help the raisins & nuts from sinking to the bottom of the loaf)  Make a well in the center of the flour mixture; set both bowls aside.

In another bowl, combine the egg, sugar, shredded zucchini, pumpkin puree and oil until will mixed.  Add zucchini/pumpkin mixture all at once into the well in the center of the flour mixture.  Stir just until moistened (batter should be lumpy).  Fold in the raisins and nuts.  Spoon batter into prepared pan.  Sprinkle the top of the loaf with ~ a 1/2 tablespoon of oats, a sprinkling of sugar & a very light spray of Pam ~ if desired.


Bake for 55-65 minutes, or until a wooden toothpick inserted near the center of the loaf comes out clean.  Cool in pan, on a wire rack, for 10 minutes.  Remove from pan.  Cover with a clean kitchen towel & cool completely on wire rack.  Once completely cool, wrap & store in an airtight container for freshness.  You can eat the bread sooner, but it has a better flavor & texture after sitting for a few hours.  Enjoy!


Related Posts Plugin for WordPress, Blogger...